Manage the Repair Process
Use the Vehicle Location tab to manage the repair process. Move a vehicle to a different department, see which departments it's been in, write production status notes, and put a job on hold.
Note: To learn how to manage dates on the Vehicle Location tab, see Manage production dates.
Each card
How to
Warning: If your shop auto-flags technicians,verify that the repair order is assigned to a technician before you change the vehicle's location.
- On the toolbar, click the Jobs menu, then click Vehicle Location under Repair Orders.
- On the Vehicle Location tab, click the appropriate card to open the expanded view.
Under Locations, click to select the department you want to move the vehicle to.

Note: To learn what the color of each department means, see "Department colors" later in this topic.
- Do one of the following:

- Click Save to save your changes and continue working on the card.
- Click Save and Close to save your changes and close the expanded view.
- On the toolbar, click the Jobs menu, then click Vehicle Location under Repair Orders.
- On the Vehicle Location tab, click the appropriate card to open the expanded view.
- Select the On Hold check box.
- In the Reason box, you can type a reason for putting the job on hold.
Do one of the following:
- Click Save to save your changes and continue working on the card.
- Click Save and Close to save your changes and close the expanded view.
The card now displays a Hold
 symbol and the repair order number appears red.
- On the toolbar, click the Jobs menu, then click Vehicle Location under Repair Orders.
- On the Vehicle Location tab, click the appropriate card to open the expanded view.
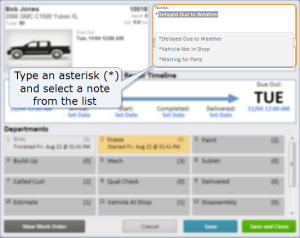
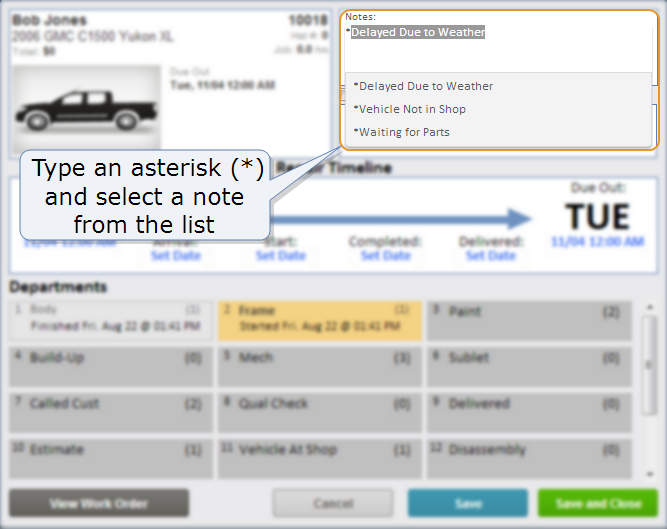
Under Notes, do one of the following:
- Type a note. As you type, a list predefined production notes that dynamically match what you've been typing appears.

- Type an asterisk (*). If the Production Status notes have been preconfigured with asterisks, select the preconfigured note in the list.
Tip: See Production Status to learn how to save data entry time by setting preconfigured notes.
- Type a note. As you type, a list predefined production notes that dynamically match what you've been typing appears.
- Do one of the following:

- Click Save to save your changes and continue working on the card.
- Click Save and Close to save your changes and close the expanded view.
- On the toolbar, click the Jobs menu, then click Vehicle Location under Repair Orders.
- On the Vehicle Location tab, in the Find box, type one of the following:
- The repair order number
- The primary contact's last name
- Click the Find icon
 (or press Enter). The search results appear.
 - If more than one card matches your search, then select (click) the correct card.
- To return to all repair orders, click the Back arrow
 .
.


Reference – the Vehicle Location tab
Component | Definition |
|---|---|
Due Out | Date and time the vehicle is scheduled to be returned to the customer. |
 | The Job On Hold  symbol displays next to the Due Out field if the repair order is on hold. symbol displays next to the Due Out field if the repair order is on hold. |
Estimator | Person who wrote the estimate. |
Hat # | Identifier for the vehicle (often a magnetic, cone-shaped "hat" placed on the vehicle's roof). |
Insurance | Insurance company handling the claim. |
Primary Contact | Primary contact (customer, owner, or insured). |
Repair Order Number | Repair order number. |
Vehicle Image | Photo resembling the vehicle type. |
Vehicle Information | Year, make, and model of the vehicle. |
| Component | Definition |
|---|---|
Notes | Notes about the production status (up to 150 characters). Production status notes appear on the following reports: Production Status Across All Jobs (#86) and Target Delivery - Classic (#177). |
On Hold | Check box indicates whether the repair order is on hold; the hold reason is given in the box below that. Note: Including a reason is optional. |
Repair Timeline | A graphic representing the time span between the Due In and Due Out dates, with other key dates plotted in between.
The graphic changes dynamically as you set, clear, and modify dates. |
Due In | The date and time the vehicle is scheduled to arrive at the shop for repair. |
Arrival | The date the vehicle arrives at the shop for repair. |
Start | The date work on the vehicle begins. |
Completed | The date the vehicle is ready to be delivered to the customer. |
Delivered | The date the vehicle is returned to the customer. |
Due Out | Date and time the vehicle is scheduled to be returned to the customer. |
Elapsed Days | The number of days elapsed since the Arrival date. |
Days Remaining | The number of days remaining until the Due Out date. A negative number indicates the number of days elapsed since the Due Out date. |
Departments | Shows each department in your shop in the order a vehicle typically moves through them. The vehicle's location history is indicated by the color of each department; details are also given about when a vehicle started or finished in that department. Each department also displays the total number of jobs currently in that area (in parentheses to the right of the department name). |
View Work Order | Opens a printable copy of the work order. |
| Cancel | Cancels any changes and closes the expanded card view. |
Save | Saves your changes but leaves the expanded card view open for you to make additional changes. Note: Until a change is made, this button appears grayed out and is unavailable. |
Save and Close | Saves your changes and closes the expanded card view. Note: Until a change is made, this button appears grayed out and is unavailable. |

| Department Color | Meaning |
|---|---|
Blue  | The department you've selected to move the vehicle to. |
Dark gray  | A department the vehicle was never in. |
Light gray  | A department the vehicle was in, but is no longer in. |
Yellow  | The department the vehicle is currently in. |