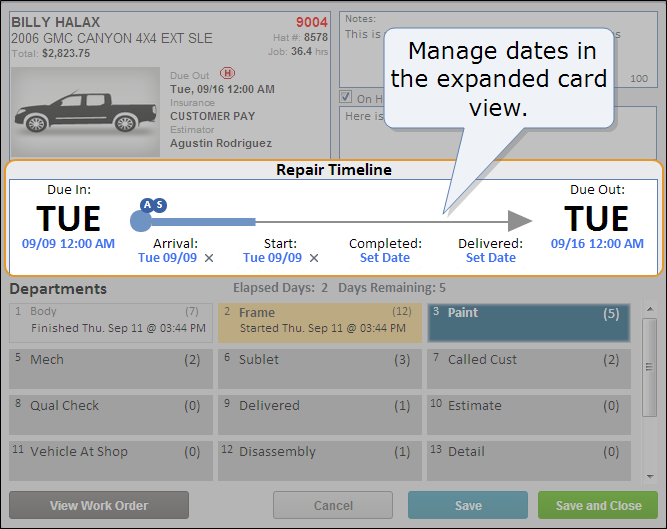
Manage Production Dates
Use the Vehicle Location tab to manage production dates for a repair order. View a repair timeline and change due in, due out, arrival, start, completed, and delivered dates.
Each cardHow to
- On the toolbar, click the Jobs menu, then click Vehicle Location under Repair Orders.
- On the Vehicle Location tab, click the appropriate card to open the expanded view.
- Under Repair Timeline, under Arrival, Start, or other date you want to set, click Set Date to select a date.
- Do one of the following:
- Click Save to save your changes and continue working on the card.
- Click Save and Close to save your changes and close the expanded view.
- On the toolbar, click the Jobs menu, then click Vehicle Location under Repair Orders.
- On the Vehicle Location tab, click the appropriate card to open the expanded view.
- Under Repair Timeline, do one of the following:
- Set a new date by clicking the date you want to change, and then select a new date.
- Clear a date without setting a new one by clicking Clear
 next to the date you want to clear.
- To change a time, click the time you want to change, and then select a new time.
- Do one of the following:
- Click Save to save your changes and continue working on the card.
- Click Save and Close to save your changes and close the expanded view. If the Change Reason box appears, type or select the reason you changed a date or time, and then click Ok.
- On the toolbar, click the Jobs menu, then click Vehicle Location under Repair Orders.
- On the Vehicle Location tab, in the Find box, type one of the following:
- The repair order number
- The primary contact's last name
Reference – the Vehicle Location tab
| Component | Definition |
|---|---|
Notes | Notes about the production status (up to 150 characters). Production status notes appear on the following reports: Production Status Across All Jobs (#86) and Target Delivery - Classic (#177). |
On Hold | Check box indicates whether the repair order is on hold; the hold reason is given in the box below that. Note: Including a reason is optional. |
Repair Timeline | A graphic representing the time span between the Due In and Due Out dates, with other key dates plotted in between. The graphic changes dynamically as you set, clear, and modify dates. |
Due In | The date and time the vehicle is scheduled to arrive at the shop for repair. |
Arrival | The date the vehicle arrives at the shop for repair. |
Start | The date work on the vehicle begins. |
Completed | The date the vehicle is ready to be delivered to the customer. |
Delivered | The date the vehicle is returned to the customer. |
Due Out | Date and time the vehicle is scheduled to be returned to the customer. |
Elapsed Days | The number of days elapsed since the Arrival date. |
Days Remaining | The number of days remaining until the Due Out date. A negative number indicates the number of days elapsed since the Due Out date. |
Departments | Shows each department in your shop in the order a vehicle typically moves through them. The vehicle's location history is indicated by the color of each department; details are also given about when a vehicle started or finished in that department. Each department also displays the total number of jobs currently in that area (in parentheses to the right of the department name). |
View Work Order | Opens a printable copy of the work order. |
| Cancel | Cancels any changes and closes the expanded card view. |
Save | Saves your changes but leaves the expanded card view open for you to make additional changes. Note: Until a change is made, this button appears grayed out and is unavailable. |
Save and Close | Saves your changes and closes the expanded card view. Note: Until a change is made, this button appears grayed out and is unavailable. |


