CDK Dealer Management ServicesCDK Global® Dealer Management System®
RepairCenter interfaces with the accounting features in the CDK Global Dealer Services® Dealer Management System (DMS). With this interface, the Repair Order (RO) exists only in RepairCenter. No CDK Repair Orders are created. All work is done in RepairCenter and after the job is completed, you can transfer data to CDK. Since the RepairCenter workflow is generally not altered, this section will address only those areas that are unique to the CDK interface.
When the repair is complete and the Repair Order has been audited for accuracy, the data can be transferred to CDK.
The data transfer includes:
-
Customer information (create new or use existing)
- Vehicle information (will update vehicle if ownership has changed)
- Service History (RO information linked to Vehicle)
- General Journal Updates (including technician payroll!)
The Repair Order number generated in RepairCenter is referenced in CDK:
-
Service History appends an M preceding the number (e.g. M12345).
-
General Journal references the exact Repair Order number.
Note: During the repair process, a CDK Repair Order does Not exist. If a sublet Purchase Order (PO) is needed in CDK, the Purchase Order is created using a MISC PO with a reference to the RepairCenter Repair Order number. Purchase Orders use the Parts PO process.
Set up CDK with RepairCenter
Before beginning the setup procedure, CDK must complete an installation that allows Mitchell to have access to your CDK system. An Authorized Dealership Representative can request installation by completing an eStore Authorization. Your Mitchell Sales Representative will provide you an instruction document for completing the eStore Authorization.
You will also need:
-
The Dealer to create a Cashier ID using the function UUP. The Cashier ID must be “mitchell”. No access rights or password is required.
- The Dealer ID (provided to Mitchell when CDK completes the installation.
- The default Company ID (store number).
- The default technician number. (Ensure that the employee numbers in RepairCenter match those in CDK.)
- Click More
 , then Configuration
 , then select the Accounting tab. The General
tab is open by default.
, then select the Accounting tab. The General
tab is open by default. - In the Select Accounting Package field, select CDK DMS.
- Click Update.
- RepairCenter will need to be restarted to make the change effective. Click the Accounting tab to trigger the restart message. Click Yes. RepairCenter restarts with CDK DMS configured as your accounting package.
- Click More, then Configuration . By default, the Shop Setup tab is selected, with the Shop Information tab displayed.
- Click the Accounting tab, and then select the CDK DMS subtab.
- Enter the information you gathered prior to starting this process (as listed above). Note: Some fields may be automatically populated. If so, check the information in the fields against the information that was given to you by your CDK Administrator.
- If you have been configured for multiple CDK companies click Add.
- A blank line appears with your cursor positioned in the Logon column. Enter your CDK Accounting Logon.
- Double-click in the Co ID and/or Desc columns to enter information.
- Repeat for each store to be added.
Note: There is a Mitchell monthly subscription charge to the body shop for each store that is configured.
- Click Update.
- Still under the Accounting tab, click the General subtab.
- Select any or all of the Invoicing Option check boxes, as desired.
- Show supplement lines on invoices. If this check box is not selected, supplement lines will not display on invoices.
- Don't archive outstanding receivables. If there are a number of payments that have not yet been received, you can select this option to keep them from being automatically archived.
- Do not show deleted lines on invoices. Selecting this check box suppresses deleted repair lines from showing on invoices.
- Set up Payment Types and Credit Card Types, as described below.
- Click Update.
Set up your Profit Centers and Chart of Accounts (COA). A configuration specialist will walk you through setting up your Profit Centers to link to your CDK COA.
Additional Settings
Set up your Profit Centers and Chart of Accounts (COA). See CDK Profit Center Setup for items specific to CDK. See also Profit Center Setup for general information regarding Profit Center Setup. Payments processed in RepairCenter will not transfer to CDK.
It is recommended that you configure RepairCenter to generate your account numbers sequentially
If For DMS, use DMS Repair Order Number only is selected, the transferred Repair Order shows on the Whiteboard with an M preceding the Repair Order once the Service History is created in CDK.
For example: Repair Order Number 12345 shows as M12345 after it is transferred.
If that option is Not selected, that same Repair Order shows on the Whiteboard as 12345/M12345 once the job is transferred to CDK.
It is recommended to select For DMS, use DMS RO Number only:
- Click Configuration.
- On the Shop Setup tab, click the General tab.
- In the Next Repair Order Number section, select the For DMS, use DMS RO Number only check box.
If you have not already done so (see Step 3 - Accounts above), proceed now to Accounts Setup to set up your Chart of Accounts.
CDK Journals
RepairCenter interfaces with the accounting features in the CDK Global Dealer Services® Dealer Management System (DMS). With this interface, the Repair Order (RO) exists only in RepairCenter. No CDK Repair Orders are created. All work is done in RepairCenter and after the job is completed, you can transfer data to CDK. Since the RepairCenter workflow is generally not altered, this section will address only those areas that are unique to the CDK interface.
When the repair is complete and the Repair Order has been audited for accuracy, the data can be transferred to CDK.
The data transfer includes:
- Customer information (create new or use existing)
- Vehicle information (will update vehicle if ownership has changed)
- Service History (RO information linked to Vehicle)
- General Journal Updates (including technician payroll!)
The Repair Order number generated in RepairCenter is referenced in CDK:
- Service History appends an M preceding the number (e.g. M12345).
- General Journal references the exact Repair Order number.
Note: During the repair process, a CDK Repair Order does Not exist. If a sublet Purchase Order (PO) is needed in CDK, the Purchase Order is created using a MISC PO with a reference to the RepairCenter Repair Order number. Purchase Orders use the Parts PO process.
When you are ready to close the repair order, the sale needs to be transferred to CDK.
- Click the Account Sales tab.
- Select the desired job.
- Click Transfer.
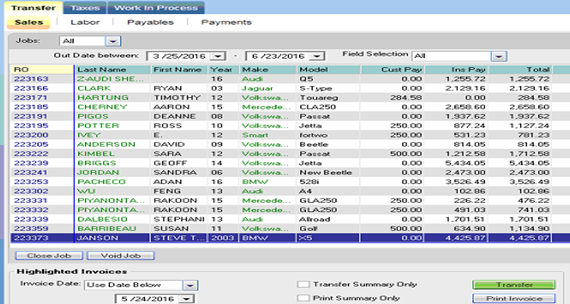
Note: You can only use the transfer feature if the transfer hasn't already been completed. An error message appears, if you click Transfer for a repair order that is already linked to CDK.
- Pre-checks are completed before DMS Verification. Follow the prompts as needed. Click Send to DMS when the DMS Verification and Send prompt appears.
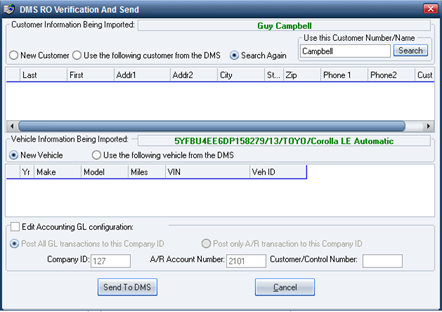
Tip: If the customer was not found, select Search Again, enter the customer's last name and click Search. When the customer is found, select Use the Following Customer form the DMS.
Note: Differences in contact information between CDK and RepairCenter are not updated when journal entries are transferred.
- Post the general ledger. Several message windows appear. When the transfer is completed, the last message window closes and the letter T appears in the Accounting Sales page in the Invoice column. You can now close the repair order.
Reference - CDK Posting Exceptions
Estimating systems round the calculation of labor sales differently than how RepairCenter consumes the data. In some cases there can be a .01 to .03 cent difference between RepairCenter and the Estimating system. When there is a difference, you will have an opportunity to update the sale before posting to the CDK journal.
If the repair order is out of balance (usually by one cent), the CDK Journal Entry window appears and you can make the necessary corrections.
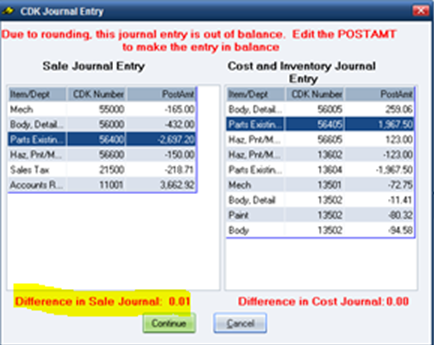
- Select the PostAmt of any of the labor Item/Dept columns that need correction.
- Increase or decrease the number as needed. (For example: If the PartsExisting field shows -2,697.20, enter 2697.21 to increase the negative number to a positive number.)
- Check the Difference in Sale Journal and make sure it shows zero. Click Continue to post.
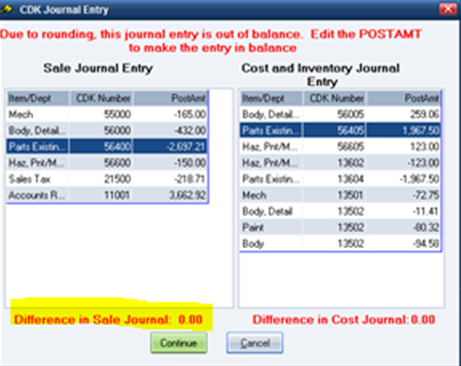
Note: You cannot edit the Sales Tax or Accounts Receivable amounts.
See Also