Configuration – Web Status
Use the Web Status tab in Configuration to set up web status![]() A standard RepairCenter feature that lets your shop keep customers and insurance companies informed of a vehicle's status..
A standard RepairCenter feature that lets your shop keep customers and insurance companies informed of a vehicle's status..
Shop licensed for the Production Management module can configure automatic web status updates. Whenever a vehicle is moved to a different department on the Vehicle Location tab, an email notification is automatically sent.
To set up web status, all shops must enable web status updates and configure which website customers and insurance companies visit to check their repair status. Once this is configured, email notifications include a link to this website.
Note: While we develop the shop-hosted website feature, you must use the Mitchell-hosted website.
How to
- On the toolbar, click the More menu list at the top right; then select Configuration.
- Click the Web Status tab.
- Under Web Status Updates, select the Enable web status updates check box.
-
Under Notifications To Vehicle Owner, click Shop Hosted, and then type http://repairstatus.mitchell.com/.
Note: We're still developing the shop-hosted website feature. In the meantime, you need to enter the Mitchell-hosted website address (step 4) and then select Mitchell as the website host (step 5).
- Click Mitchell.
-
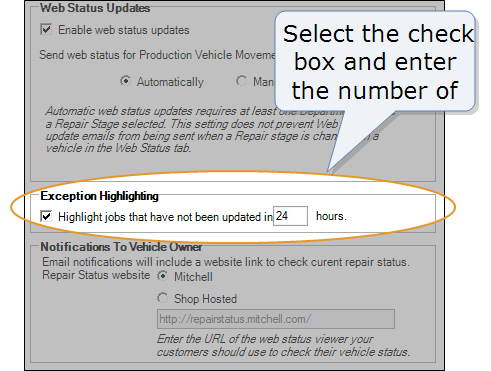
To enable exception highlighting, select the check box under Exception Highlighting and enter a number of hours (up to 999).
- Click the Update button to save your work.
If you're enabling automatic web status updates, be sure departments are set up before beginning web status setup.
- On the toolbar, click the More menu list at the top right; then select Configuration.
- Click the Web Status tab.
- Under Web Status Updates, select the Enable web status updates check box.
- Do one of the following to choose a Send web status for Production Vehicle Movement option:
- To enable automatic web status updates, click Automatically.
- To require manual web status updates, click Manually.
-
Under Notifications To Vehicle Owner, click Shop Hosted, and then type http://repairstatus.mitchell.com/.
Note: We're still developing the shop-hosted website feature. In the meantime, you need to enter the Mitchell-hosted website address (step 5) and then select Mitchell as the website host (step 6).
- Click Mitchell.
-
To enable exception highlighting, select the check box under Exception Highlighting and enter a number of hours (up to 999).
- Do one of the following, depending on your step 4 selection:
- If you clicked Manually, click Update to save your work. Web status setup is now complete.
- If you clicked Automatically, proceed to step 9.
-
Under Department Settings, click each arrow
 in the Stage column to select the repair stage that prompts an automated web status update.
Tip: Click Manage departments to open the Departments tab, where you can adjust the shop's departments.
- When you're finished selecting stages, click Update to save your work.

