Sales in Shop
Use the Sales In Shop tab under the Sales category on the Analytics menu to see all repair orders that are in process (repair orders that have a start date, but have not yet been completed), and that have a cost or invoice associated with them.
The number of in process jobs is shown at the bottom of the tab, along with the total dollar amount.
Available filters allow you to view all sales information or specific details.
How to
- On the Analytics menu, click Sales > Sales in Shop.
- If you have chosen to schedule FastLane jobs (see Schedule), the Show FastLane check box appears. Select this check box to see only FastLane jobs; leave the check box cleared to see all jobs.
- If applicable, the Include Multi-Shops check box appears; select this check box if desired. (In step 8 below, you will set the multi-shop criteria.)
- In the Date field, the default is All.
From the list, select Due In, Started,
or Due Out. If you select a choice other than All, additional fields
appear that allow you to specify a date range.

- In the between field, select the beginning and ending dates for the date range, using the calendars.
- Click the Apply Filter button to implement the filters you have specified.
- In the bottom section of the tab there is a secondary filter (Second Filter check box). This option will appear only if you have applied the filters in the upper section of the tab. To specify additional criteria by which to filter, select the Second Filter check box, then select the secondary filter from the list in the Filter on field (All, Make, Estimator, or Insurance Company).
- If you select anything other than All in the Filter on field, then the having field appears; enter or select the specific Make, Estimator, or Insurance Company.
- To filter further, click the radio button next to the additional filter you want to use. The default filter is All; you can also select Estimator, Make, or Insurance Company. For example, you can select Insurance Company as your main criteria, then further limit the list by Estimator. This would result in a list of repair orders that include only that insurance company and that estimator.
- Click the Apply Filter button to implement the additional criteria. (The Apply Filter button is activated only if filtering changes have been made.)
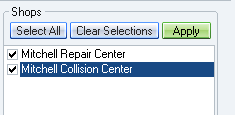
- If you chose to include multi-shops in step 3, a small box appears with check boxes and buttons in the bottom right corner of the tab. You can change the number and selection of shops to be included in the calculation by selecting the appropriate check boxes. Click the Select All button in the box to include all shops listed; click the Clear Selections button to clear all check boxes. Click the Apply button to implement the changes you've made.

- On the Analytics menu, click Sales > Sales in Shop.
- Adjust the filters as desired. (See Filter Sales in Shop Information above.)
- Click the Print button in the upper right corner of the tab; a preview of the Work in Process report appears on your screen.
- Click the print icon
 in the upper left corner of the report to
send it to your printer.
In the bottom left section of the tab, there is a summary list of in process jobs. You can view All jobs, or only those jobs associated with a specific Estimator, Make, or Insurance Company. This summary shows Total Jobs and Total Sales. You can view this list on your screen in report form and print a hard copy, if you wish.
- On the Analytics menu, click Sales > Sales in Shop.
- In the summary list in the bottom left section of the tab, select the criteria/filters: All, Estimator, Make, or Insurance Company.
- If you want to use additional criteria/filters, select the Second Filter check box in the bottom section of the tab, then identify the secondary filter. For example, you could select Due In as your main criteria, then further filter the list by Insurance Company. This would result in a list of repair orders that are due in within the range of dates given and that are associated with that insurance company.
Note: The filter criteria for the list above must include a range of dates for Due In, Started, or Due Out. If All is selected, the Second Filter will not be available. - Select the Print Summary Only check box (located in the upper right corner of the tab).
- Click the Print button in the upper right corner of the tab; a preview of the Work in Process report appears on your screen.
- Click the print icon
 in the upper left corner of the report to
send it to your printer.
Reference