Partner Analysis
Use the Partner Analysis tab under the Analytics menu to track and analyze information on vendors, DRP and insurance partners, and parts status. The following tabs are available under the Partner Analysis tab:
- Vendor Analysis
- DRP/Insurance Analysis
- Parts Status
Partner Analysis is available in the Premium Analytics module and is included in the Premiere package.
How to
The Vendor Analysis tab contains valuable information to help you track and analyze vendor-related data, such as actual discount information, cost analysis, lead time, and vendor reliability (percentage of returned parts).
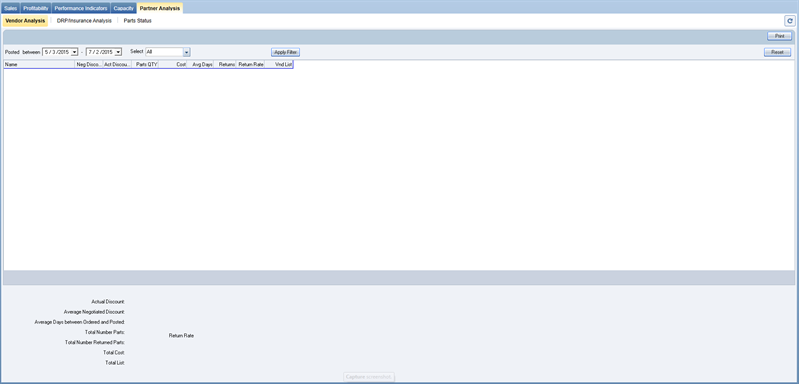
- Specify the date range for which vendor information should be analyzed. Choose dates in the Posted between field, by selecting beginning and ending dates in the calendars.
- In the Select field, click the down arrow and select from the list: All to filter on all repair orders; Estimator to filter on a specific estimator; Insurance Company to filter on a specific insurance company.
- The default selection is All. If Estimator or Insurance Company is selected, a having field appears. Select the estimator or the insurance company from the list.
- Click the Apply Filter button to the right of these fields to implement new criteria.
- Click the Reset button at the top right of the tab to return to all default filtering options (the default is All, with a date range of 90 days from the current date).
- Review the bottom section of the tab to view totals for vendor data found in the date range specified.
- If your shop is licensed and configured for multi-shops, a check box labeled Include Multi-Shops is available. Select this check box to include multi-shop data in the analysis.
- Click the Print button to preview the Vendor Analysis report on your screen.
- From the report preview, click the print icon
 at the top left to send it to your printer.
The DRP/Insurance Analysis tab contains information regarding repair versus replacement activity, as well as OEM parts versus alternate parts on repair orders within a specified Due Out date range.
If you have the Estimate Rules Analyzer module licensed, you will also be able to see this information when the analysis is run from the Jobs menu, on the Opportunities > List View tab, or from the Whiteboard.
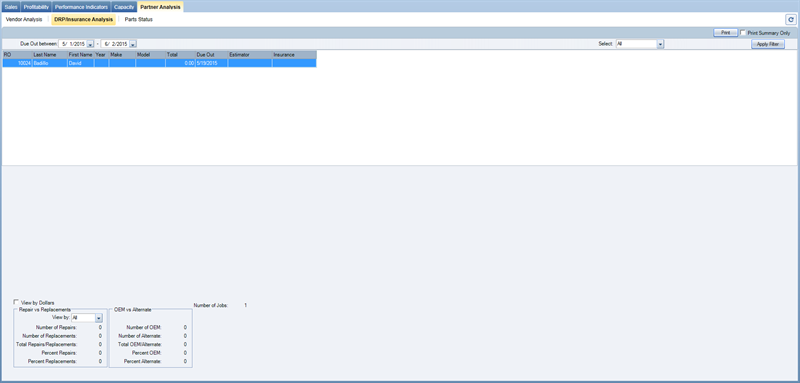
- Specify the due out date range by choosing dates in the Due Out between field; select beginning and ending dates in the calendars.
- In the Select field, click the down arrow to select from the list: All to filter on all repair orders; Make to filter on a specific type of vehicle; Estimator to filter on a specific estimator; Insurance Company to filter on a specific insurance company.
- The default selection is All. If you select one of the other options from the list, an additional field, having, is provided to choose additional criteria. Select the desired vehicle make, estimator, or insurance company from the list.
- Click the Apply Filter button at the top right of the tab to implement new criteria.
- Review the bottom section of the tab to view the results of filtering and related counts. The total Number of Jobs field is also provided.
- Select the View by Dollars check box to see the totals in dollar amounts instead of by a count of repair orders.
- In the Repair vs Replacements box, you can view number and percentage of repairs and replacements. In the View by list, select either All, Body, or Mech.
- In the OEM vs Alternate box, you can review the number and percentage of OEM parts used, compared to alternate parts used.
- Click the Print button to preview the DRP/Insurance Analysis report on your screen.
- From the report preview, click the printer icon at the top left to send it to your printer.
- Select the Print Summary Only check box next to the Print button for an abbreviated report.
The Parts Status tab contains the status of parts associated with all open repair orders.
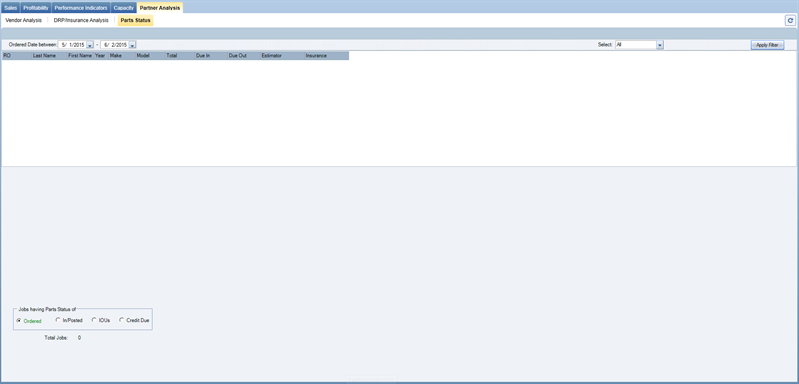
- Specify the ordered date range by choosing dates in the Ordered Date between field; select beginning and ending dates in the calendars. This will include repair orders with parts activity within a specified date range, starting from when the part was ordered.
- In the Select field, click the down arrow to select from the list: All to filter on all repair orders; Make to filter on a specific type of vehicle; Estimator to filter on a specific estimator; or Insurance Company to filter on a specific insurance company.
- The default selection is All. If you select one of the other options from the list, an additional field, having, is provided to choose additional criteria. Select the desired vehicle make, estimator, or insurance company from the list.
- Click the Apply Filter button to the right of these fields to implement new criteria.
- Review the bottom section of the tab for information related to Jobs Having Parts Status of. Click on one of the following choices: Ordered, In/Posted, IOUs, or Credit Due.
Note: The parts status dictates which date is used. For example, if the status you select is Credit Due, repair orders with returns processed within the date range will appear. - Note that the Total Jobs field indicates the total number of repair orders included in the list above, determined by the criteria/filters specified.
- If your shop is licensed and configured for multi-shops, a check box labeled Include Multi-Shops is available. Select this check box to include multi-shop data in the parts status.
If your shop is licensed and configured for multi-shops, a check box labeled Include Multi-Shops appears at the top of the Vendor Analysis and Parts Status tabs.
- Select the Include Multi-Shops check box to include multi-shop data in the vendor analysis or in parts status.
-
When this check box is selected, a small box appears in the lower right of the tab; it lists all the shops included in the multi-shop group.
- In the box, change the number and selection of shops to be included in the calculation by selecting the appropriate check boxes. Click Select All to include all shops; click Clear Selections to clear all check boxes.
- Click the Apply button in the box to implement the changes you've made.
- For more information, see the sections Shop Information Setup and Shop Switcher.
Reference
| Field | Description |
|---|---|
| Columns | |
|
Name |
Name of the vendor. |
|
Neg Discount % |
Negotiated discount percentage that you expect to receive from the vendor, as set up in the vendor record. |
|
Act Discount % |
Actual discount percentage you received on invoices from that vendor for the specified date range. |
|
Parts QTY |
A count of parts that have been received from the vendor for the specified date range. |
|
Cost |
Total cost of parts that have been received from the vendor for the specified date range. |
|
Avg Days |
Average number of days it has taken to receive parts, calculated from the date parts were ordered until the invoice date entered when the parts were received. If parts are ordered and received on the same day, the number of days for those parts would be 0. If parts are ordered one day and received the next day, the number of days for those parts would be 1. If a part is ordered on a Thursday and received the next Monday, the number of days for those parts would be 4. |
|
Returns |
Total count of parts that were returned in the specified date range. If the part was received outside of the specified date range but returned within the date range, the return would be counted; however, the part would not be included in the parts quantity (as it would not have been received in the date range.) |
|
Return Rate |
Calculated by dividing the parts returned by the quantity of parts received in that same date range. |
|
Vnd List |
The vendor list that was entered when the parts were received. It does not take into consideration whether or not a Parts Price Change (PPC) was applied. |
| Bottom Section | |
|
Totals |
The following totals are based on all invoices from all vendors that are included in the list above. |
|
Actual Discount |
Total actual discount (percentage). |
|
Average Negotiated Discount |
Average negotiated discount (percentage). |
|
Average Days between Ordered and Posted |
Average number of days between the date parts were ordered and the date they were posted. |
|
Total Number Parts |
Total number of parts ordered. |
|
Total Number Returned Parts |
Total number of returned parts. |
|
Total Cost |
Total cost of parts purchased from this vendor. |
|
Total List |
Total list amount for parts from this vendor. |
|
Return Rate |
The return rate, calculated by dividing the number of parts returned by the number of parts received in the same date range (percentage). |
| Buttons, Check Boxes, and Lists | |
|
Posted between |
Calendars specify date range; select beginning and ending dates. |
|
Select |
Field with three choices: All, Estimator, or Insurance Company. Your selection will filter the data and the report to focus on either all repair orders matching the criteria, or just those with either the estimator or insurance company specified. |
|
Apply Filter |
Button used to implement the filters you have selected, such as date range, etc. |
|
Reset |
Button used to return to all default filtering options (the default is All, with a date range of 90 days from the current date). |
|
|
Button used to preview the Vendor Analysis report. To print the report displayed on your screen, click the printer icon button |
| Field | Description |
|---|---|
| Columns | |
|
RO |
The job's repair order number. |
|
Last Name |
Vehicle owner's last name. |
|
First Name |
Vehicle owner's first name. |
|
Year |
Model year of the vehicle. |
|
Make |
Make of the vehicle. |
|
Model |
Specific model of the vehicle. |
|
Total |
Total amount of the repair order. |
|
Due Out |
Date the vehicle repair is scheduled to be completed and the vehicle delivered to the customer. |
|
Estimator |
Name of the estimator who originated the repair order. |
|
Insurance |
Name of the insurance company associated with this repair order. |
| Bottom Section | |
|
View by Dollars |
Check box used to view totals in dollar amounts instead of by a count of ROs. |
|
Repairs vs Replacements |
Box containing numbers and percentages of repairs versus replacements during the date range. |
|
View by |
List that allows you to select job type categories to specify how to view totals, by All, Body, or Mech. |
|
Number of Repairs |
The total number of repairs completed in the shop during the date range. |
|
Number of Replacements |
The total number of replacements completed in the shop during the date range. |
|
Total Repairs/Replacements |
The total number of both repairs and replacements completed in the shop during the date range. |
|
Percent Repairs |
The percentage of repairs compared to the overall jobs in the shop during the date range. |
|
Percent Replacements |
The percentage of replacements compared to the overall jobs in the shop during the date range. |
|
OEM vs Alternate |
Box containing numbers and percentages of OEM parts versus alternate parts used during the date range. |
|
Number of OEM |
The number of OEM parts used during the date range. |
|
Number of Alternate |
The number of alternate parts used during the date range. |
|
Total OEM/Alternate |
The total number of both OEM and alternate parts used during the date range. |
|
Percent OEM |
The percentage of OEM parts compared to the overall parts used during the date range. |
|
Percent Alternate |
The percentage of alternate parts compared to the overall parts used during the date range. |
|
Number of Jobs |
The total number of jobs in the shop during the date range. |
| Buttons, Check Boxes, and Lists | |
|
Due Out between |
Calendars to specify date range; beginning and ending dates are provided. |
|
Select |
Field with four choices: All, Make, Estimator, Insurance Company. Your selection will filter the data and the report to focus on either all repair orders matching the criteria, or just those with either the make, estimator, or insurance company specified. |
|
Apply Filter |
Button used to implement the filters you have selected, such as date range, etc. |
|
|
Button used to preview the DRP/Insurance Analysis report. To print the report displayed on your screen, click the printer icon button |
|
Print Summary Only |
Check box to print only a summary of the data. |
| Field | Description |
|---|---|
| Columns | |
|
RO |
The job's repair order number. |
|
Last Name |
Vehicle owner's last name. |
|
First Name |
Vehicle owner's first name. |
|
Year |
Model year of the vehicle. |
|
Make |
Make(r) of the vehicle. |
|
Model |
Specific model of the vehicle. |
|
Total |
Total amount of the repair order. |
|
Due In |
Date the vehicle is scheduled to come into the shop. |
|
Due Out |
Date the vehicle repair is scheduled to be completed and the vehicle delivered to the customer. |
|
Estimator |
Name of the estimator who originated the repair order. |
|
Insurance |
Name of the insurance company associated with this repair order. |
| Bottom Section | |
|
Jobs having Parts Status of |
Contains selections you can choose for parts status. |
|
Ordered |
Indicates that the parts status of Ordered should be used in creating the data. |
|
In/Posted |
Indicates that the parts status of In/Posted should be used in creating the data. |
|
IOUs |
Indicates that the parts status of IOUs should be used in creating the data. |
|
Credit Due |
Indicates that the parts status of Credit Due should be used in creating the data. |
|
Total Jobs |
Total number of jobs included in the data. |
| Buttons, Check Boxes, and Lists | |
|
Ordered Date between |
Calendars to specify date range; beginning and ending dates are provided. |
|
Select |
Field with four choices: All, Make, Estimator, Insurance Company. Your selection will filter the data and the report to focus on either all repair orders matching the criteria, or just those with either the make, estimator, or insurance company specified. |
|
Apply Filter |
Button used to implement the filters you have selected, such as date range, etc. |