Assign Technicians
Use the Assign Technicians tab to assign technicians to the operations for a repair order. By using the assignment feature of RepairCenter, you can accomplish many required payroll tasks.
There are four main areas on the Assign Technicians tab:
- The main section of the tab contains the list of labor operations that need to be performed for the repair order.
- The bottom left section of the tab is the area where you assign technicians, either by selecting Standard Assignment or Allocate based on Actual Hours.
- In the bottom center section of the tab is a box that gives the total estimated hours compared to the assigned hours for each labor type. Just above this box is the field Total for Selected lines.
- To the right of that box are the dates associated with the repair order.
Note: Before you assign technicians, you may want to view technician assignments to view the current assigned/flagged hours for all technicians and to see all ongoing and completed jobs. By viewing technician assignments, you can review a technician's hours before assigning additional work. You can also ensure that assigned hours are distributed evenly among technicians in a department.
How to
- In an open repair order, click the Labor tab.
- The Labor tab should open to the Assign Technicians tab; however, if it does not, click the tab to view technician assignments.
View technician assignments by clicking the View Tech Assignments button in the bottom section of the Assign Technicians tab. The Technician Review box appears; it shows a summary of all assigned hours for all jobs within a selected date range.

The following table describes how you can use the Technician Review box.
| To | Do this |
|---|---|
|
Change the date range |
Click the Begin and End arrows to choose new dates, then click the Refresh button. |
|
View hours for only incomplete jobs |
Click to clear the Include jobs that are completed check box. Note: Dates are based on date assigned and date posted. |
|
View the details of a technician's hours |
Double-click the technician line (by name) to open the Assignments box. Note: The Include jobs that are completed check box affects which jobs are displayed in the Assignments box. Click |
When you are finished, click ![]() to close the Technician Review window.
to close the Technician Review window.
- On the Whiteboard, double-click the repair order, then select the Labor tab. The Assign Technicians tab is open by default.
- In the bottom left section of the tab, select Standard Assignment.
- Assign by line or lines:
- In the main section of the tab, highlight the labor line or lines to be assigned.
- From the list of employees below, select the check box for the technician, then click the Assign button.
- Assign by labor type:
- If you want to
assign all lines of the same type to one technician, in the Labor Type field (top left, above the labor list), click
 and select the desired labor type (Paint, Body, Frame, etc.). All lines of that labor
type appear highlighted in the list.
and select the desired labor type (Paint, Body, Frame, etc.). All lines of that labor
type appear highlighted in the list. - Select the technician from the list of employees below, then click the Assign button. The technician's name appears in the Assigned To column for all the highlighted lines.
- Assign multiple technicians to a single labor line or lines by selecting more than one employee check box in the list of employees. This gives you the ability, for example, to have an apprentice working with an experienced technician. The word Multiple appears in the Assigned To column. By default, the hours are distributed equally among the number of assigned technicians. For example, if you assign two technicians, they are each assigned 50% of the hours.
- The default percentage when assigning multiple technicians is to distribute the hours equally between the number of technicians selected.
Note: All lines in the Labor tab must be assigned in order for the Whiteboard to show a Yes in the Labor column. - Once your assignments are complete, click the Print Work Order button at the top right of the tab. Select the work order you wish to print. (See Print the Work Order below.)
Tip: If you encounter problems with RepairCenter when working on jobs with scrubbed labor lines, verify that the scrubber list does not contain duplicate items.
This procedure applies only to employees who are paid hourly. If a technician or technicians have already clocked time for a repair order, those hours can be allocated based on the actual hours worked. See Time Management for manually entering actual hours.
- On the Whiteboard, double-click the repair order, then select the Labor tab. The Assign Technicians tab is open by default.
- In the lower left area of the tab, select Allocate based on Actual Hours.
- Lines having the same labor type will be highlighted in the list.
- If there has been no work activity recorded for that labor type, you will see a message stating that.
- Click the Next button to highlight the next labor type group, until the table is populated with the recorded hours worked for that labor type.
- Click Allocate & Next to allocate the actual hours and move to the next labor type (if any).
Note: All lines in the Labor tab must be assigned in order for the Whiteboard to show a Yes in the Labor column.
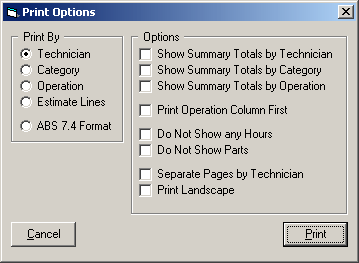
- Once the technicians are assigned, you can print by clicking the Print the Work Order button at the top right of the tab. The Print Options box appears.
-
Specify the desired format by making selections in the Print Options box. Selections made in the Print Options box will stay selected as that workstation's default settings until they are changed. The following is an example of the Print Options box.
- On the Whiteboard, double click the RO, then select the Labor tab. The Assign Technicians tab is open by default.
- Click the Add Supplement Labor button. The Supplement Labor box appears.
- Fill in the required info and click OK. The additional labor line will not be sent to the estimating system, but will set a Supplemental Labor indicator
 on the Whiteboard.
 - Revise the estimate to include the supplemental labor and re-import the supplement to RepairCenter.
Note: If additional labor is not added to the estimating system, it automatically becomes a shop-pay line. This means that the sales total is not increasing, but you are increasing costs by paying over and above labor sale hours. When additional labor is not added to the estimate, the Supplemental Labor indicator will not clear from the Whiteboard.
- On the Whiteboard, double-click the RO, then select the Labor tab. The Assign Technicians tab is open by default.
- Click the Add Supplement Labor button at the top right of the tab; the Supplement Labor box appears.
- Make the required changes to Dept (Paint, Body, etc.), Description, Operation (Refinish/Repair, Remove/Install, etc.) Hrs, and Sup #; then click the OK button in the box.
- Revise the estimate to include supplemental labor changes and re-import the supplement to RepairCenter.
Note: If additional labor is not added to the estimating system, it automatically becomes a shop-pay line. This means that the sales total is not increasing, but you are increasing costs by paying over and above labor sale hours. When additional labor is not added to the estimate, the Supplemental Labor indicator will not clear from the Whiteboard.
You can add notes to a work order. All notes display at the bottom of the work order, on the classic Work Order Report and on the RO Assignment Report.
- On the Whiteboard, double-click the RO, then select the Labor tab. The Assign Technicians tab is open by default.
- Click Work Order Notes. The Work Order Notes box appears.
- Click Add Note.
- Enter a Name for the note in the lower portion of the box, then enter the name.
- Click Save.
- Click
 to
close the box.
to
close the box.
If there are procedures that you do not want performed by technicians, create a new "employee" with a bogus name.
- Create a fake employee with a bogus name such as "Mock Shop" or any other name you choose. (See Employee Setup to create a new employee.)
- On the Whiteboard, double-click the repair order. Select the Labor tab.
- In the Assign Technicians tab, assign technicians as usual (see above).
- Highlight the line or lines to be un-assigned.
- Right-click and select Un-Assign from the list.
- With the line or lines still highlighted, from the Employees list, select the bogus name you created.
- Click Assign.
- Repeat steps 5-8 for other lines, as needed.
Note: All lines within the Labor tab must be assigned in order for the Whiteboard to show a Yes in the Labor column.
Example
In your estimating program, the labor for Cover Car is classified as Body labor. In RepairCenter, it's classified as Paint labor. Add Cover Car to the labor scrubber so that the category will be automatically corrected from Body to Paint whenever an estimate that includes Cover Car is imported into RepairCenter.
Warning: Add labor to the scrubber only when it is always performed by the technicians in the category you're adding it to.
To learn more about the labor scrubber, including how to add labor lines that aren't in a specific repair order, see Configuration – labor scrubber.
- On the Whiteboard, double-click to open the repair order you want to work in.
- In the open RO, click the Labor tab. The Labor tab opens to the Assign Technicians tab.
- On the Assign Technicians tab, click to select the line you want to scrub.
- In the Labor Type column, double-click the entry for the selected line, then select a new option.
- Click the Add to Labor Scrubber button at the bottom of the tab.
- In the confirmation message, click OK. The labor line is added to the Scrubber tab under the Labor tab on the Configuration menu.
Reference
| Field | Description |
|---|---|
|
Columns |
|
|
Labor Type |
The labor type as set up in the Accounting for Profit Centers. |
|
Group |
For CCC One® users only: The Group column is populated by the parts/labor group as provided by an estimate written in CCC One®. If the estimate is not written in CCC One®, this column will be empty. |
|
Description |
Description of the labor operation to be assigned. |
|
Op |
Operation to be performed, as imported from your estimating system. |
|
Est Hours |
Estimated number of hours it is expected to take to perform the labor operation. |
|
Asn Hours |
The hours assigned to the technician to perform the required labor. |
|
Assigned To |
Technician or technicians that the task is assigned to. |
|
New |
New Line - Y or N identifies lines that were created within RepairCenter, outside of the original estimate. |
|
# |
Number associated with the line sequence in your estimating system. |
|
Finished |
Finished - Y or N indicates whether the job has been completed or not. This is a read-only field, as the information is populated when the feature is used within the Shop Clock. |
| Line Note | Note associated with the labor line. |
|
Buttons and Boxes |
|
|
Labor Type |
In this list, select the labor type (Paint, Body, Frame, Mech, and all user-defined types available) to highlight all lines with the same type. This allows you to assign multiple lines of the same type to a specific technician or technicians. |
|
Work Order Notes |
Click this button to add appropriate notes to be printed on the work order. |
|
Print Work Order |
When the labor has been assigned, click this button to print the work order. See Print the Work Order above. |
| Show Hidden Labor | Select this check box to show hidden labor. |
|
Revert to Original Labor Type |
Click this button to revert back to the original labor type. |
|
Add Supplement Labor |
Click this button to add or edit supplemental labor. |
|
Add to Labor Scrubber |
Click this button to add the highlighted line or lines to the Labor Scrubber list. This item is also available as a right-click option. See Labor Scrubber for more information. |
|
Change Labor Type |
Click this button to change the labor type of the selected line. This option is not available if labor has already been assigned to the highlighted line. This item is also available as a right-click option. |
|
Review Converted Labor |
For lines that have been converted, highlight the line, then click this button to review the details. This item is also available as a right-click option. |
|
Bottom Section of Tab |
|
| Standard Assignment |
If selected, technicians are assigned as described in Assign Technicians - Standard Assignment above. |
|
Allocate based on Actual Hours |
If a technician or technicians have already clocked time for a repair order, those hours can be allocated based on the actual hours worked. |
|
Show techs from all schedules |
When Standard Assignment is active, selecting this check box shows all technicians from those scheduled in the box to the left. |
|
View Tech Assignments |
Located just above the technician list. With Standard Assignment, click this button to open the Technician Review box and see a list of all jobs assigned. This helps to make sure no technician is over-assigned or under-assigned jobs. It is also useful to ensure that hours are evenly assigned to technicians within the department. To see a list of all jobs (in-process and complete), select the Include jobs that are completed check box in the Technician Review box. Double-click the technician to see the details of the totals displayed in the Technician Review box. |
|
Assign |
Click this button to complete the standard assignment procedure. |
|
Total for Selected |
Displays the total for the selected labor type and allocation. |
| Type |
Totals for the labor type. |
|
Est Hours |
Totals for the estimated number of hours. |
|
Asn Hours |
Totals for the hours assigned to technicians to perform labor. |
|
% Asn |
The percentage of assigned hours. |
|
Started |
Start date of the repair. |
|
Due Out |
Date the repair is expected to be completed. |
|
Internal Out |
Internal date repair is expected to be completed. |
|
Completed |
Date repair order was completed. |
|
Save |
Click this button to save any changes made to this section. |
| Option | Description |
|---|---|
|
Add to Labor Scrubber |
Use to add the highlighted line or lines to the Labor Scrubber list. Also available as a button below the list. See Labor Scrubber for more information. |
|
Change Labor Type |
Select to change the labor type of the selected line. Not available if labor has already been assigned to the highlighted line. This option is also available as a button below the list. Note: Changing a labor type will adjust the sales dollars. |
|
Un-Assign |
Used to un-assign labor from the highlighted line or lines. Highlight the line or lines and use this right-click option or click the Un-Assign button below the list. |
|
Hide Labor Line |
This option allows you to hide the selected labor line. To see hidden labor lines, select the Show Hidden Labor check box above the list. Hidden labor lines display in color when shown. |
|
Do Not Calculate Wash and Prep |
This option is available for a job only if your shop is configured to Automatically add Detail labor for Wash and Prep and deduct for all labor assignments. To learn more about this setting, see Production – General. Select Do Not Calculate Wash and Prep to remove both the Wash and Prep labor line and all values in the Asn Hrs column. Any technician already assigned (but not flagged) is also removed. If an assigned technician is flagged, a message appears asking "Labor has already been Flagged for this Labor Category. Are you sure you wish to continue with Un-assigning Labor?" Click Yes to remove the technician, then right-click and reselect Do Not Calculate Wash and Prep to clear the Asn Hrs column. |
|
Save All Lines to CSV File |
Permits you to save all labor lines to a .CSV file. Right-click anywhere on the list, select this option, browse to the desired file folder, name the new file, and click Save. |