Ordering Parts
Use the Parts tab, then the Order sub-tab to order parts from within a specific Repair Order (RO). The Parts and Order tabs are available if you have the Parts Management module licensed.
How to
- Review your part types before placing a parts order.
- Mark critical parts.
- Add non-part items to the Scrubber list. It is important to remove ("scrub") these items so that the Whiteboard part status is accurate. Common items that would be scrubbed include Cover Car, Flex Additive, Clips, etc. (See Parts Scrubber for detailed instructions.)
- If a part type needs to be changed for a specific RO (e.g., an item that will be sublet), you have the option of making that change.
- If a part type needs to be changed from AM/Used to OEM, notify the estimator. Change the part type in the Order tab prior to ordering the part. The part must be deleted in the estimate and re-added from the database in order for the part type to change in RepairCenter. This is true with any estimating system used.
There are two ways to access the Order tab:
- On the Whiteboard, double-click an RO to open it. Click the Parts tab; the Order tab is open by default.
- On the Whiteboard, if the preview pane is showing in the lower half of the screen, click the Parts link; the Order tab is open by default.
- On the Whiteboard, double-click the RO, then click the Parts tab; the Order tab is open by default.
- In the Part Type field of the Order tab, click
 to choose the part type that you want to order. All parts that match that part type are highlighted.
Note: If you want to order more than one part type, you must have set this option in Configuration > Parts, Allow ordering of parts across part type. - In the Purchase Order area at the bottom of the screen, select the Vendor.
- In the Purchase Orderarea, enter or confirm the Expected By date.
- The PO # is automatically generated, adding a sequential number to the RO number (123-1, 123-2, etc.) for each subsequent parts order. Once the order is placed, you can change this number by right-clicking on the line and selecting Change PO.
- As needed, fill in the Attention field and the Ship Via field. If these fields were set up in the vendor file, they will be automatically populated here.
- If desired, add a note or notes to the purchase order by entering the text in the Note box.
- The Ordered By field is automatically populated with the user's ID.
- Click Order. The purchase order displays on the screen.
- Review the purchase order for accuracy, then click
 at the top left of the window to print or fax a copy.
 - If you are sending the purchase order electronically, select the device type (email, OEC, or DMS) and click Send Order.
- On the Whiteboard, double-click the RO, then click the Parts tab; the Order tab is open by default.
- Do one of the following:
- If ordering one part, select the part to be ordered by clicking the line.
- If ordering multiple parts and the lines are in sequence, click the first line and drag the cursor to the last part to be ordered.
- If ordering multiple parts and the lines are not in sequence, hold down the CTRL key and click each line to be ordered.
- In the Purchase Order area at the bottom of the screen, select the Vendor.
- In the Purchase Order area, enter or confirm the Expected By date.
- The PO # is automatically generated, adding a sequential number to the RO number (123-1, 123-2, etc.) for each subsequent parts order. Once the order is placed, you can change this number by right-clicking on the line and selecting Change PO.
- As needed, fill in the Attention and Ship Via fields. If these fields were set up in the vendor file, they will be automatically populated here.
- If desired, add a note or notes to the purchase order by entering the text in the Note box.
- The Ordered By field is automatically populated with the user's ID.
- Click Order. The purchase order displays on the screen.
- Review the purchase order for accuracy, then click at the top left of the window to print or fax a copy.
- If you are sending the purchase order electronically, select the device type (email, OEC, or DMS) and click Send Order.
- On the Whiteboard, double-click the RO, then click the Parts tab; the Order tab is open by default.
- Right-click the part that you wish to cancel.
- Select Cancel Order.
- Re-order the part as usual.
If a part has not yet been received, and if lacking this part will hinder the integrity, performance, or safety of the vehicle, then you cannot deliver the vehicle until the part is received.
- On the Whiteboard, double-click the RO, then click the Parts tab; the Order tab is open by default.
- Highlight the back-ordered part; it must contain a vendor name and show "Ordered" as the status.
- Select the check box in the Back Order column on the part line. (The Back Order column header may be abbreviated as "B," depending on the column width. If this is the case, roll your cursor over the header to see the complete name.)
- A "B" indicator will then populate the Parts Status (PS) field on the Whiteboard.
- When the back-ordered part arrives, remove the "B" indicator and receive it as usual.
Note: To print a report of all back-ordered parts, go to Report > Parts > Vendor Report #114. Select the "Back Ordered" filter and change the date range.
If a part has not yet been received, and if lacking this part will not hinder the integrity, performance, or safety of the vehicle, then you can deliver the vehicle and issue an IOU slip to the customer for the specific part. The RO can then be closed and the part received at a later date.
- On the Whiteboard, double-click the RO, then click the Parts tab; the Order tab is open by default.
- Highlight the part still owed to the customer; it must contain a vendor name and show "Ordered" as the status.
- Select the check box in the IOU column on the part line. (The IOU column header may be abbreviated as "I," depending on the column width. If this is the case, roll your cursor over the header to see the complete name.)
Note: An I indicator will then populate the Parts Status (PS) field on the Whiteboard. - Print the customer an IOU slip for the specific part: On the Reports menu, click Parts, and select the Parts IOU slip. Click
 to preview the IOU slip on the screen; click
  to print it.
 - Pre-close the RO as usual. The Whiteboard will reflect less than 100% of parts received, but there must be a "Yes" in the Parts Ordered column.
- Deliver the vehicle to the customer and pass the file to Accounting for closing.
- When the owed part arrives, remove the I indicator and receive it as usual on the closed RO. (From the Whiteboard, use the search feature to locate the closed RO.)
- Notify the customer that the part has arrived.
Note: To print a report of all IOU parts, go to Report > Parts > Parts IOU Call Back Report #103.
- On the Whiteboard, double-click the RO, then click the Parts tab; the Order tab is open by default.
- Highlight the part to be converted.
- Click the Part Type drop-down, then click Sublet.
- The Status changes to Hide. The part is still displayed in the Order screen until either you leave the screen or press F5 to refresh.
- Click the Sublet tab. The line appears in the sublets list.
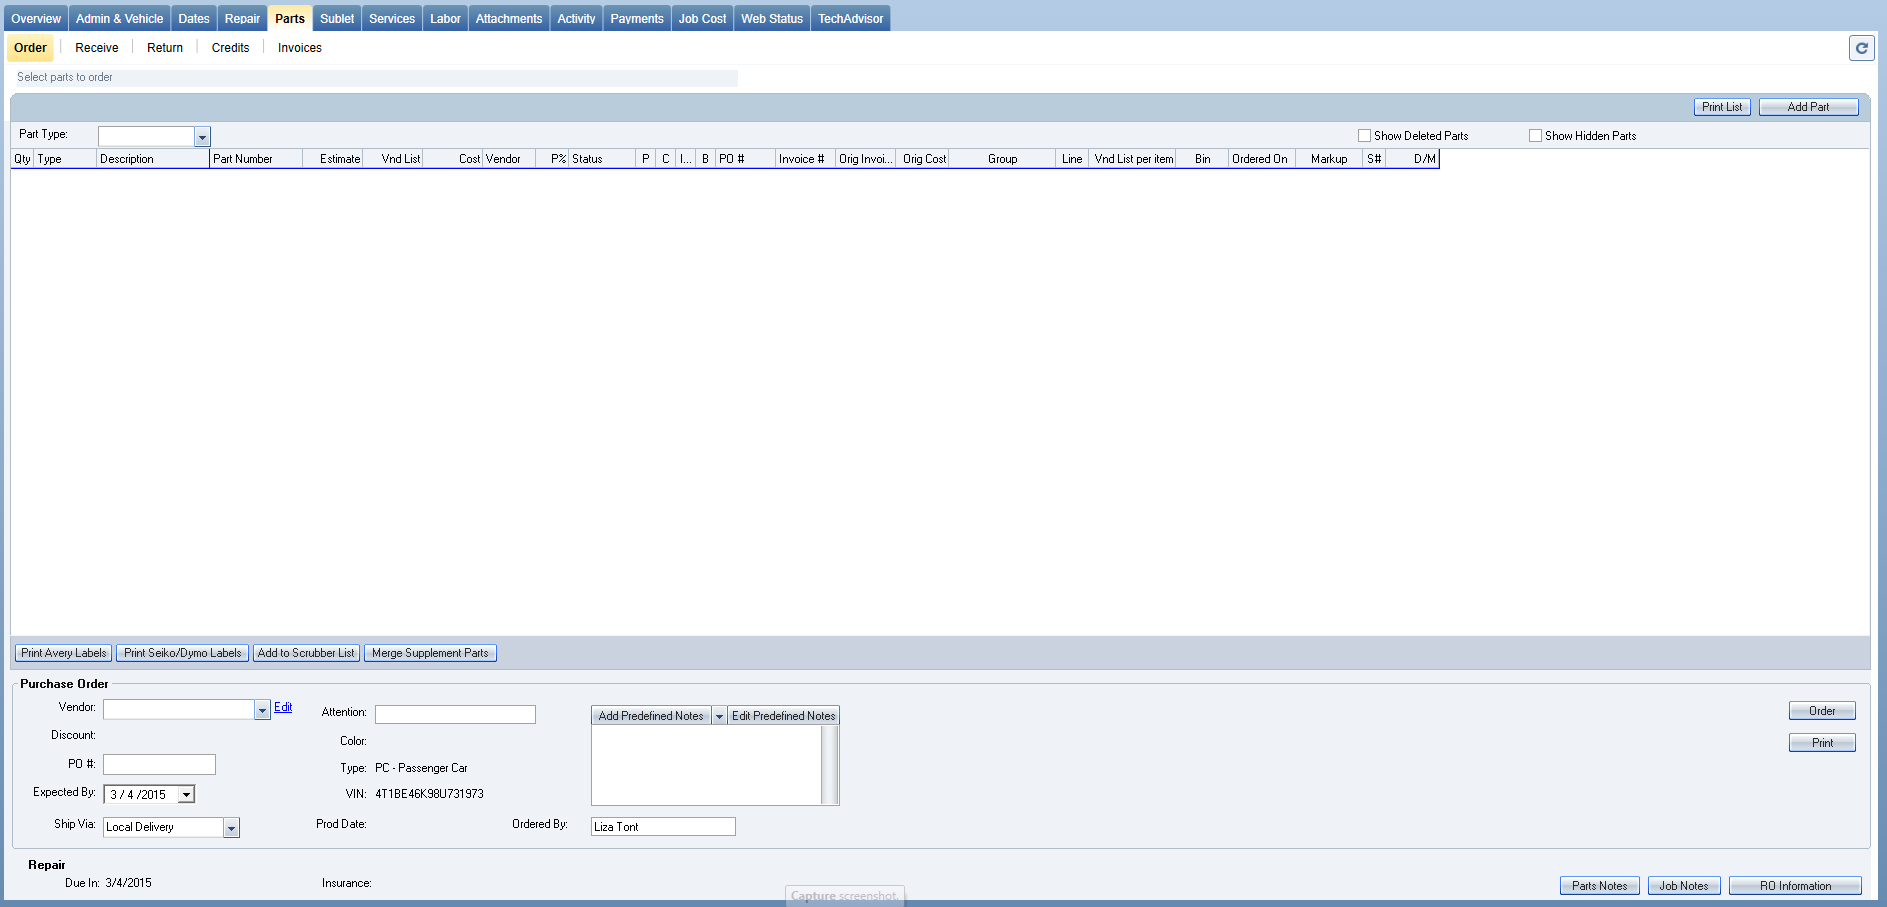
- Add note(s) to a purchase order during the ordering process by entering a note in the white area under the Add Predefined Notes and Edit Predefined Notes options. (See image below.) The note entered in this area will print in bold text on the purchase order.
- Create predefined notes in a purchase order to avoid having to enter the same note(s) in other ROs. Once you create predefined notes, you will be able to select the note to be entered from a drop-down menu in the Add Predefined Notes list.
- On the Whiteboard, double-click the RO, then click the Parts tab; the Order tab is open by default.
- To edit a predefined note, in the Purchase Order area at the bottom of the screen, click Edit Predefined Notes.
- The Notes dialog box appears. Existing notes appear in a list at the bottom of the dialog box.
- In the existing note list, highlight the note to be changed. The complete note text appears in the box above the list.
- Make the desired changes to the text, then click Save.
- To add a new predefined note, in the Purchase Order area at the bottom of the screen, click Add Predefined Notes.
- A list appears; enter a name for the note (such as Dates Change, Call Customer, etc.) and select a Type.
- Enter the note text in the white area.
- If appropriate, select the Critical check box.
- Click Save.
Reference
The Order tab (below the Parts tab) is used to create a parts purchase order that can be printed, faxed, or sent electronically via e-mail or (if licensed) OEC or DMS to your parts vendor. Once you have ordered all the parts for an RO, the Whiteboard status reflects the change in the Parts column. A "No" will change to a "Yes" to confirm that all parts have been ordered.
|
Note: For abbreviated column headings, roll your cursor over the heading to see the full name or description. |
||
|
Field Name |
Editable |
Description |
|
Columns |
|
|
|
Qty |
Y |
Quantity of part needed. |
|
Type |
Y |
The part type (New, Used, AM, etc.). Prior to ordering the part, the type can be edited by double-clicking in the column and selecting a different type from the drop-down menu. Once the part has been ordered, the type cannot be changed unless the order is cancelled. |
|
Description |
N |
Name of the part as imported from your estimating system. |
|
Part Number |
Y |
Part number as imported from your estimating system. You can change it by double-clicking and typing in a new Part Number. |
|
Estimate |
N |
The expected list price as imported from your estimating system or as entered on a manually-created RO line. If a line discount has been applied, this amount is shaded yellow. |
|
Vnd List |
Y |
The actual list price as provided by the parts vendor. You can change it by double-clicking and typing in a new amount. |
|
Cost |
Y |
Your cost, as provided by the vendor (the amount is calculated for you if the discount percentage is set up in your vendor file, but may be changed if necessary). You can change it by double-clicking and typing in a new amount. |
|
Vendor |
Y |
The part supplier. When the part is ordered, the vendor name appears in this column. You can also double-click to manually add the vendor to the line, or to change to a different vendor. |
|
P% |
N |
Shows the actual discount for each part that has a vendor and cost. A 25% markup will read as a 20% discount, as described in Profit Calculation. Markups are calculated on cost and discounts are calculated on list. |
|
Status |
Y |
Status of the part: Ordered, Not Ordered, Back Ordered, Inventory, Maintain, In, Removed, Hide, and On Hold. The status can be changed by right-clicking in the column and selecting from the drop-down list. It can also be changed by right-clicking and selecting Change Status. For back-ordered or IOU parts, a status of B or I displays on the Whiteboard under the PS column. |
|
P |
Y |
If the part is paid for by Cash On Delivery (COD), then select this check box prior to clicking Receive. With this check box selected, the invoice is highlighted in yellow in the Accounting Payables tab. This alerts the person transferring data to Accounts Received that the invoice should not be transferred. |
|
C |
Y |
Indicates whether the part is a Critical part or not. If a part is a critical, that status appears on the purchase order. |
|
I... |
Y |
IOU indicates a part still owed to the customer. Marking a part as IOU provides the ability to close the repair order. Print an IOU receipt for the customer and receive the parts on the closed repair order. |
|
B |
Y |
Indicates that the part has been back-ordered. |
|
PO# |
Y |
The purchase order number populates this column when the part is ordered. RepairCenter generates the PO number from the RO number, adding a sequential number (123-1, 123-2, etc.) for each subsequent parts order. Once the order is placed, you can change this number by right-clicking on the line and selecting Change PO. |
|
Invoice # |
Y |
When the part is received, the vendor invoice number appears here. |
|
Orig Invoice # |
N |
The original invoice number appears here when you return a part. If the part is re-ordered and re-received, the invoice number for the originally received part is retained in this field. |
|
Orig Cost |
N |
The original cost of the part appears here if you have returned a part. |
|
Group |
N |
For CCC One® users only: If parts are selected from a group in the estimating system, that information displays here. |
|
Line |
N |
The line reference number, which also appears on the purchase order. You and your parts vendor may refer to it regarding any parts on a purchase order. |
|
Est Each |
N |
Price for each part; this is particularly useful when ordering quantities of more than one. This amount is updated if the quantity and/or vendor total is changed. |
|
Bin |
Y |
If the shop uses bin numbers, this column indicates the location of the part in the shop. You can change it two ways: 1) Double-click the field and type in a new value, or 2) With the line highlighted, right-click and select Change Bin. A small dialog box appears that allows you to enter a different bin number. |
|
Ordered On |
N |
Date the part was ordered. |
|
Markup |
|
Your cost, plus any markup applied to after-market parts. |
|
S# |
N |
If the part was added to the RO as a result of a supplemental estimate, the supplement number appears here. |
|
DMS Invoice # |
N |
If a Dealership Management System (DMS) interface is installed, this field displays the invoice number that was generated by the DMS. (This column is not visible if a DMS interface is not installed.) |
|
D/M |
N |
If there was a line discount or markup applied in the estimating system, the discount or markup percent shows here. |
|
Buttons, Check Boxes, Fields |
||
|
Print List |
|
Click to print a report showing the entire parts list. |
|
Add Part |
|
When a part is added from this button, it does not change the RO totals. It places an indicator on the Whiteboard to alert the estimator to add it to the estimate. If the invoice includes a part that was not ordered, you will need to add the part to the Parts tab in order to complete the invoice posting. |
|
Part Type |
Y |
Aids in selecting all parts of the same
type. Click the arrow |
|
Show Deleted Parts |
Y |
If selected, parts that have been deleted are included in the list. Deleted parts are displayed in red. |
|
Show Hidden Parts |
Y |
If selected, parts that have been designated as hidden are shown in the list. Hidden parts show Hide in the Status column. |
|
Print Avery Labels |
|
If you use Avery labels, click to print the highlighted part or parts on Avery labels. |
|
Print Seiko/Dymo Labels |
|
If you use a Seiko or Dymo label printer, click to print the highlighted parts on the appropriate label. |
|
Add to Scrubber List |
|
Adds the selected part(s) to the scrubber. |
|
Merge Supplement Parts |
|
When supplemental parts are manually added, you must still add them to the estimating system and import them as supplements in order to adjust the sales totals. If the supplemental part descriptions are exact, they will automatically merge upon importing. If the descriptions do not match, select both lines, always highlighting the "Not Ordered" part first and then the "Posted" line, and then click Merge Supplement Parts. |
|
Purchase Order |
||
|
Note: If the highlighted part line has been ordered, these fields are read-only. |
||
|
Vendor/Edit |
Y |
The vendor from whom you are ordering the highlighted part or parts. Click Edit to view and edit the vendor list, if needed. |
|
Discount |
N |
The discount you receive from the selected vendor. |
|
PO # |
Y |
The purchase order number. RepairCenter generates the PO number from the RO number, adding a sequential number (123-1, 123-2, etc.) for each subsequent parts order. Once the order has been placed, you can change this number by right-clicking in the PO# column in the parts list and selecting Change PO. The change will also occur in this PO # field in the Purchase Order area. |
|
Expected By |
Y |
Date the parts are expected to be received in the shop. |
|
Ship Via |
Y |
Preferred shipping method; the preference you enter in this field will also appear on the purchase order. |
|
Attention |
Y |
If the vendor setup included a contact name, that name will appear in the Attention field. If desired, the name can be changed before the order is completed. If the field is blank, you can add a name. |
|
Color, Type, VIN, Prod Date |
N |
Non-editable fields identifying the vehicle for this repair order. |
|
Notes/Add Predefined Notes |
Y |
Before completing the purchase order, you have the option of adding notes. You can type in notes in the white note box or you can choose from a list of predefined notes. |
|
Edit Predefined Notes |
Y |
The list of predefined notes can be added to or edited. |
|
Ordered By |
Y |
The logged-in user's ID is automatically entered in this field. |
|
In-House Job |
Y |
Select this check box if the part is for an in-house job. In-house (internal) job amounts will not be reflected on profitability reports. |
|
Order |
|
Click to order the selected line(s). |
|
|
|
Select a line that has an Order Status, then click Print to see a preview of the purchase order for that selected part. All parts on the same purchase order will be included. (Not available if parts have not yet been ordered.) |
|
Repair |
||
|
Due In |
N |
Date the vehicle is due to be brought into the shop for repair. |
|
Insurance |
N |
The insurance company, as named on the RO, which is responsible for payment. |
|
Parts Notes |
|
Click to see all parts notes associated with this RO. |
|
Job Notes |
|
Click to see all job notes associated with this RO. |
|
RO Information |
|
Click to see administrative and vehicle information associated with this RO. |
Place your cursor anywhere on the Parts list on the Order tab and right-click to make the following options available.
|
Right-click Options |
|
|
Change Bin |
If the shop uses bins for storing parts, the bin number appears in the Bin column in the list. You can change the bin number two ways: 1) Double-click the field and type in a new value, or 2) With the line highlighted, right-click and select Change Bin. A small dialog box appears that allows you to enter a different bin number. |
|
Change Part Type |
The Part Type (New, Used, AM, etc.) can be changed two ways: 1) Double-click in the column and select a different type from the drop-down menu, or 2) Right-click and select Change Part Type. A small dialog box appears that allows you to select a type. The part type will appear in green, indicating that it has been changed. Once the part has been ordered, the type cannot be changed. If it becomes necessary to change the part type after it has been ordered, you must cancel the order prior to changing the type. |
|
Change PO |
Once an order has been placed, the PO number can be changed by right-clicking on the line and selecting Change PO. A small dialog box appears that allows you to edit the existing PO number. The PO # in the Purchase Order section of the Order tab reflects the change in the number. By default, the PO number will be the repair order number followed by a dash and a number. The number following the dash denotes the number of POs processed on the RO to date. |
|
Change Status |
The Status of the part (Ordered, Not Ordered, Back Ordered, Inventory, Maintain, In, Removed, Hide, On Hold) can be changed two ways: 1) Double-click in the column and select a status from the list, or 2) Right-click and select Change Status. A small dialog box appears that allows you to select a different status. |
|
Change Vendor |
With the part line highlighted, right-click and select Change Vendor to add a vendor or change an existing vendor. When the part is ordered, the vendor name appears in the Vendor column. You can also double-click in the column to manually add the vendor to the line, or to change to a different vendor. The vendor name is also reflected in the Vendor field in the Purchase Order area of the Order tab. |
|
Print Track Labels |
If you use an older printer that uses tractor-feed labels, (labels that are on a roll with holes on either side that feed the labels through the printer), you can print your parts labels by right-clicking and selecting this check box. |
|
Delete |
Right-click and then choose this option to delete the highlighted part(s) from the Parts tab. The line will not be deleted from the estimate or repair order. To delete the part permanently, delete the line in the estimating system and import a supplement. |
|
Remove Delete Indicator |
Before you can remove the Delete indicator, you must first click Show Deleted Parts. Then, highlight the line, right-click, and select Remove Delete Indicator. The part will no longer be considered deleted. |
|
Cancel Order |
Cancels the order of the highlighted parts line or lines. (From the Order tab, you can cancel only one line at a time. If multiple parts need to be canceled on an order, go to the Receive tab, highlight all parts to be canceled, and right-click to cancel the entire order.) |
|
Turn off Red X on Whiteboard |
When a part is deleted in the estimating system, the line will be identified in red text on the entire line in the Parts tab. A red X displays in the "S" column of the Whiteboard. After you review the part to make sure it is returned or handled in some manner, you have the option of removing the red X. In the Order tab, right-click and select this option. |
|
Save all Lines to CSV File |
Allows you to save the parts lines to a CSV file for exporting to other programs. |
|
Add to Scrubber List |
Allows you to add the highlighted part to the scrubber. (Always change the Part Type and Status prior to using this option.) |
| Status | Definition |
|---|---|
|
Ordered |
Indicates that the part has been ordered. When Order is clicked to complete a parts order, the parts status automatically changes from Not Ordered to Ordered. Parts with a status of Ordered are displayed on the Receive tab. |
|
Not Ordered |
The default status for all parts that haven't been added to the parts scrubber. |
|
Back Ordered |
Manually select this status to indicate that the part is back-ordered and that you're tracking it. Note: You can print a Vendor Report of back-order statuses. |
|
Inventory |
Indicates that you're taking this part from the shop inventory. This status is typically used for the clips and bolts the shop keeps in stock. |
|
Maintain |
This status is typically used with the |
|
In |
Indicates that the part was delivered to the shop and verified for accuracy, but has yet to be officially received. The parts work flow isn't complete until parts with a status of In are balanced with the invoice from the supplier. The invoice is balanced during the process of receiving parts. When Receive is clicked to complete parts receipt, the In status is automatically changed to Posted. |
|
Removed |
Indicates that the part and its purchase order are deleted. When this status is selected, the Whiteboard tab displays a Parts Deleted The deleted part remains listed on the Order tab. |
|
Hide |
Hidden parts aren't listed on the Receive tab, and are excluded from the percentage of parts received that is displayed on the Whiteboard and Overview tabs. In rare instances, a shop may configure the parts scrubber to hide the part so it isn't displayed on the Receive tab. Note: Only parts with a status of Not Orderedcan be changed to Hide. |
|
On Hold |
If you put a job on hold, you should also change the part status to On Hold. This status is information-only. |
|
Posted |
Indicates that the invoice is balanced and the receiving parts process is complete. When Receive is clicked to complete parts receipt, the In status is automatically changed to Posted. If your shop is licensed for Accounting, the posted part invoice is displayed on the Payables tab and can be transferred to your accounting program. |
| Returned | Indicates that the part has been previously received (posted) and then Returned. When returning a part, a prompt appears asking if you will be ordering the part again. If you select Yes the status will show as Returned. |
| Returned/Zeroed | Indicates that the part has been previously received (posted) and then Returned. When returning a part, a prompt appears asking if you will be ordering the part again. If you answer No the status will show as Returned/Zeroed. |
