Vendor Setup
Use the Vendors tab to set up and manage the contact and administrative information for the vendors that your shop works with.
Vendor Setup is available with the Parts, Sublet, and Service modules. Vendors must be set up prior to ordering or receiving parts or sublet invoices.
Vendors are merchants who regularly do business with your shop, whether selling parts, subletting services, or renting cars.
Vendors can be imported to RepairCenter if you are using QuickBooks. If you are using any other accounting software, you must enter the Vendors manually.
After you import or create a new vendor, use the Detail and/or Specialty tabs to supply detail information regarding the highlighted vendor.
Note: The vendor name and address fields in RepairCenter must exactly match those in the accounting system. If they are different, addresses in RepairCenter will override the accounting system.
How to
There are three paths that will take you to the Vendors Tab: (Note: You must have appropriate permissions to edit vendors.)

Note: You must have permission to add new vendors. Prior to adding any new vendors, confirm with the accounting department or manager that you do have permission to add new vendors. Some vendors require IDs; also if vendors are duplicated in some accounting programs, they cannot be edited or merged.
- Access the Vendors tab. (See Access to the Vendors Tab above.)
- Click New.
- Enter the appropriate information in the Name, Address, Contact, Summary, and Order Profile tabs.
- If the vendor is a Primary DMS
 Dealer Management System Vendor, be sure to
select that check box. This will set the vendor for shops with a dealership interface. Note: There can only be one Primary DMS Vendor per shop.
Dealer Management System Vendor, be sure to
select that check box. This will set the vendor for shops with a dealership interface. Note: There can only be one Primary DMS Vendor per shop. - Click Update to save the information.
- Select the Specialty tab. With the vendor still selected in the list, click the appropriate auto manufacturer check box or boxes for which this vendor will be the default vendor. Only one vendor can be designated for each specialty, but one vendor can have multiple specialties. When you order parts for a vehicle which has a Specialty Vendor selected, that vendor will automatically be selected during the parts ordering process. If necessary, you can override this default in the ordering process.
- As each manufacturer is selected, their name appears on a new line in the Preferred Part Vendor for list. The Category on each line identifies what type of merchandise the vendor has available for the selected Make. The categories will be determined by the profit centers set up in accounting. You will have options such as Parts New, Parts Used, Parts AM, etc. You will be ordering parts by Category. Click the Category column to choose a category from the drop-down list.
- For vendors that have multiple specialties, the Category assignments can be done line by line or by using the links at the bottom of the grid. To assign the same category to all specialties, select Highlight All, and then select the category from the drop-down list that appears to the right of the Highlight All selection. This is very useful when selecting your default Parts AM, Parts Used, and Parts Recond vendors.
- You can also click Add a New Line. This creates a blank line below any existing lines. Click in both the Make and Category columns to select the appropriate information from the drop-down lists.
If you are a QuickBooks user, your vendor information can be imported after it is exported via the file created by QuickBooks. (Be sure the XML interface is set up correctly in General Settings.) This import process should only be used the first time you set up vendors. If you import the list again, all your vendors will be duplicated. Additions to the vendor list after the initial setup should be done manually within RepairCenter. RepairCenter will create them in QuickBooks, as needed..
If you are using any other accounting software, you must enter the Vendors manually.
- Export your vendor file from QuickBooks into a directory that you can easily locate. (In QuickBooks: File > Utilities > Export > List of IIF Files > Vendor List.)
- Access the Vendors tab in RepairCenter. (See Access to the Vendors Tab above.)
- Under the Vendor list, click Import.
- Select the file created by QuickBooks in step 1 above.
- The vendor list is automatically imported into RepairCenter. Depending on the size of your vendor list, it can take up to a minute or two to import the file.
Although the option to import from other accounting systems displays in the program, the import only works if the file exported by the accounting system is in a .CSV![]() The .CSV (Comma Separated Values) format is the most common import and export format for spreadsheets and databases. In RepairCenter, you can export information to a .CSV file to allow you to view and manipulate the information in a spreadsheet format. format.
The .CSV (Comma Separated Values) format is the most common import and export format for spreadsheets and databases. In RepairCenter, you can export information to a .CSV file to allow you to view and manipulate the information in a spreadsheet format. format.
Note: Canadian shops using Simply Accounting can export their Vendor list directly to Simply Accounting by selecting the appropriate directory and file. (See Simply Accounting documentation for further details.)
The Vendor List can be exported to a .CSV file. This file can then be used for other applications.
If you have a duplicate vendor, you can merge the two vendors.
Note: If you interface with an accounting system, be sure to select the vendor that matches exactly the vendor record in your accounting system. If using QuickBooks, utilize the account merge function in their system to correct duplicate vendors prior to using Merge Facility in RepairCenter.
- Access the Vendors tab. (See Access to the Vendors Tab above.)
- Right-click anywhere in the Vendor list and select Merge Facility. The Merge Facility dialog box appears.
- Scroll through the list to find duplicates that may be different by only a word or abbreviation. For our example, we will merge Carson's Car Dealership and Carson's Dealership, making Carson's Car Dealership the "parent."
- Highlight Carson's Car
Dealership, and then click
 .
. - The Available Records dialog box appears. Carson's Car Dealership is highlighted in a list entitled Select Master Record. Click Add.
- Click Carson's Dealership,
and then click
 . The Group Vendors dialog box appears. (For
our example there is only one "duplicate" but you can select
multiple names, if necessary.)
. The Group Vendors dialog box appears. (For
our example there is only one "duplicate" but you can select
multiple names, if necessary.) - You are asked if you would like to group the selected Vendors with Carson's Car Dealership. Click OK.
- Carson's Car Dealership appears in the field entitled Parent Vendor, and Carson's Dealership appears in the area below it.
- When all duplicate records have been merged under one "parent" name, click Stop Adding.
- Click Update all Database Records to save the changes.
- A message appears, telling you that this action finalizes all database records and cannot be undone. Click OK.
-
Repeat step 3 for other duplicate vendor names.
-
Click Close when done.
- When you refresh
the screen
 , only the "parent" vendors appear in the Vendors
list.
, only the "parent" vendors appear in the Vendors
list.
If you want to identify an existing vendor as the vendor for certain parts, you can identify them as a Preferred Part Vendor (Specialty).
Note: If you are adding a new vendor, this procedure can be done during that process. See New Vendors above.
- Access the Vendors tab. (See Access to the Vendors Tab above.)
- Select a vendor name from the list.
- Click the Specialty tab. With the vendor still selected in the list, click the appropriate auto manufacturer check box or boxes for which this vendor will be the default vendor. Only one vendor can be designated for each specialty, but one vendor can have multiple specialties. When you order parts for a vehicle which has a Specialty Vendor selected, that vendor will automatically be selected during the parts ordering process. You can override this default within the ordering process, if necessary.
- As each manufacturer is selected, their name appears on a new line in the Preferred Part Vendor for list. The Category on each line identifies what type of merchandise the vendor has available for the selected Make. The categories available will be determined by the profit center set up in accounting. You will have options such as Parts New, Parts Used, Parts AM, etc. You will be ordering parts by Category. Click the Category column to choose a category from the drop-down list.
- For vendors that have multiple specialties, the Category assignments can be done line by line or by using the links at the bottom of the grid. To assign the same category to all specialties, select Highlight All, and then select the category from the drop-down list that appears to the right of the Highlight All selection. This is very useful when selecting your default Parts AM, Parts Used, and Parts Reconditioned vendors.
- You can also click Add a New Line. This creates a blank line below any existing lines. Click in both the Make and Category columns to select the appropriate information from the drop-down list.
The new OEC integration, requires RepairCenter to be re-authorized to the OEC Portal.
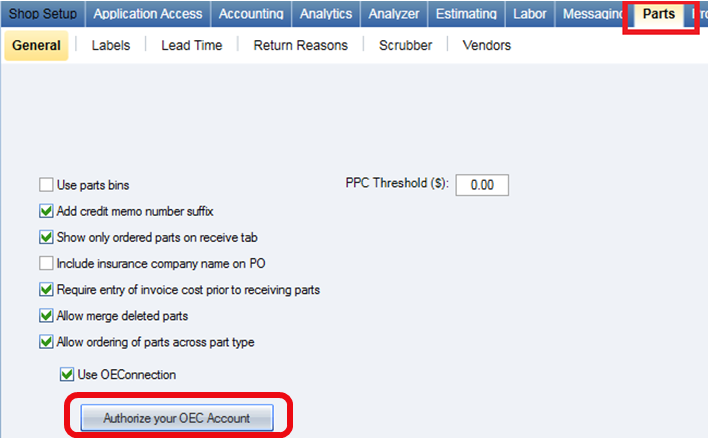
- Click More, and then click Configuration.
- Click the Parts tab.
- On the General tab, click Authorize your OEC Account. The OEC Portal window appears.
- Enter your OEC Portal credentials in the OEC Portal window, and then click Authorize App.
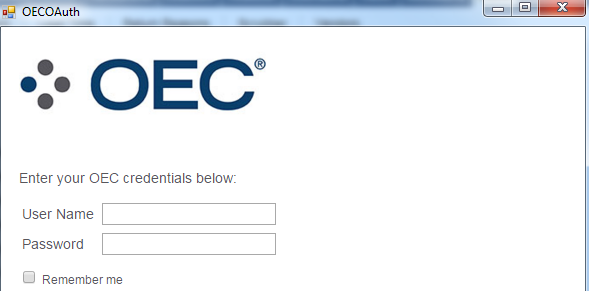
Tip: If you do not know your OEC Portal Credentials, call OEC Portal Support at 888-776-5792, and press Option 2. A representative will help you find your credentials.
- Click OK at the prompt.
The OEC Interface requires vendors to be re-mapped to communicate with OEC portal with the new OEC portal.
- Click More, and then click Configuration.
- Click the Parts tab, and then click the Vendors tab.
-
Select the vendor you want to map in the Vendors box.
- On the Detail tab, click the Summary tab, and then click
 next to the OEC Vendor Name field. The OEC Vendor list appears.
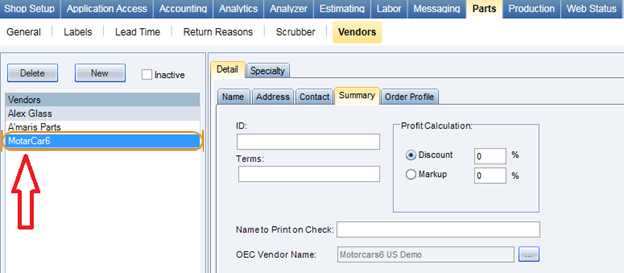
- Enter the vendor's name in the Name field, and then click Search.
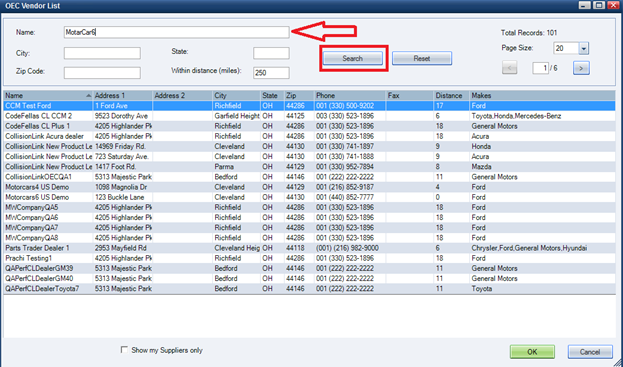
- Select the vendor you want to match in the filtered list, and then click OK.
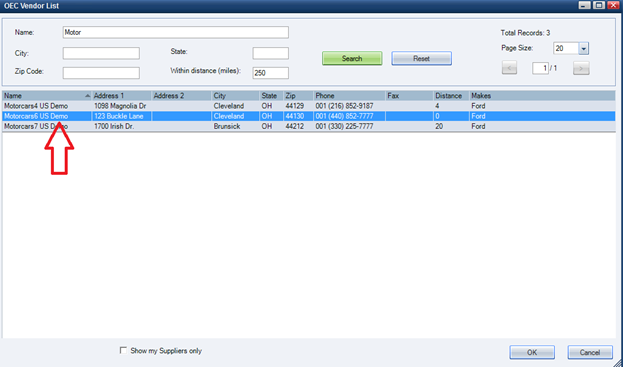
- Repeat the steps above until all of your OEC vendors are mapped.
Reference
Place the cursor anywhere on the list and right-click to make available the following options.
|
Vendors |
|
|
Delete |
Select a vendor from the list and click Delete to delete that vendor. If the vendor has been used anywhere in the system, you cannot delete it. Instead, mark the vendor Inactive. |
|
New |
Click to add new vendors to the list. |
|
Inactive |
Highlight a vendor name then select this check box to indicate the vendor is inactive. |
|
Import |
Except for QuickBooks, a CSV file format is needed to be able to import data. When selected, a dialog box appears in which you can select the CSV file to import. For QuickBooks users, the vendor file can be directly imported from QuickBooks. See the section "Importing from QuickBooks" above. |
|
Export |
When selected, a dialog box appears in which you can determine the file name and directory where you want to save a CSV file of your vendor list. |
|
Primary DMS Vendor |
If you are part of a Dealer Management System, a selection box will display to the right of the Detail and Specialty tabs. Select this check box for your primary DMS vendor. You can have only one primary DMS vendor per shop. |
|
Detail Tabs |
|
|
Name |
Identifies the vendor name, phone numbers, and the type of product or service they supply. The options are: Parts, Service, Supplies, Merchandise, and Support. The selection is informational only and does not appear in other parts of RepairCenter. |
|
Address |
Full billing address of the vendor. |
|
Contact |
The main contact's name and e-mail address, and the name of the vendor's Manager. The contact name entered will print on your parts purchase orders. |
|
Summary |
|
|
— ID |
If interfaced with an accounting system that uses an identifier for the vendor, the Vendor ID should display here. When invoices are sent to the accounting system, the Vendor ID will be used. |
|
— Terms |
Informational only. Enter the payment terms for the particular vendor. For example, Net 30, EOM, 1% disc by the 15th. |
|
— Name to Print on Check |
If using the QuickBooks interface and you want to print a name that is different from the Vendor's name, enter the name that you want to print on the check. Otherwise, leave this field blank. This is useful when you have a consolidated invoice vendor or when several vendors have multiple physical locations but one central billing department. |
|
— OEC Vendor ID |
If licensed for OEConnection's Collision Link, an OEC-assigned vendor ID must be entered here. Click the ellipses (...) next to the field to connect with the OEC Web site and display a list of available vendors. |
|
— OEC Vendors |
If licensed for OEConnection's Collision Link, selecting OEC Vendor will connect with the OEC Web site and display a list of available vendors. |
|
When you receive parts, the cost of each part will be automatically calculated based upon the discount you enter here for each invoice you receive from this vendor. It is recommended that you use the Discount field because some estimating system interfaces will not import correctly if there is a value in the Markup field. However, if a markup is entered, the vendor list is calculated based on a simple markup from the cost that you enter while receiving parts. If you want the discount after the markup to be a specific percentage, you will need to use the following formula to calculate a percentage to enter in the Markup field. When you know only the net discount (D), use the following formula to calculate the markup (M):
For example:
|
|
|
Order Profile |
Informational only. Select the method that is normally used for placing orders. The choices are: Call in, Fax, E-mail, Mail, and OEC. The fault shipping options are: Local Delivery, Pick Up, Postal Service, FedEx, UPS, Truck, and Freight. |
|
— Edit |
When clicked, you have the option to add, delete, or edit shipping options to the Ship Via list. |
|
Specialty Tab |
|
|
Specializes In: |
Informational only. If applicable, the highlighted vendor's specialty is shown as a checked box in this list. Multiple vendors can specialize in the same make. |
|
Preferred Part Vendor for: |
If applicable, lists the selected vendor's specialty makes and category of products. |
|
— Make |
Select the make. If a vendor is identified as a Preferred Vendor for a particular make, the vendor will be the default used when ordering parts for that make. Only one vendor can be the Preferred Vendor for a particular make. |
|
— Category |
Select the type of part or service the vendor provides. The options available will be determined by the profit centers set up in accounting. You will have options such as Parts, Parts New, Parts Used, Parts AM, etc. |
|
Highlight All |
Select all items in either list. |
|
Remove Highlights |
Remove all highlights from either list. |
|
Delete |
Delete the selected specialty lines from the list. |
|
Add a New Line |
Add a new Vendor to the Preferred Part Vendor list. |