Set Up Mobile Access
Use the below steps to configure mobile access for RepairCenter Shop Users.
How to
RepairCenter Administrators can grant mobile access to existing shop users using the steps below. Once the steps are completed, the user must sign in to RepairCenter and complete the registration form.
Note: If the existing user is set up in multiple shops to use the RepairCenter Shop Switcher utility, do not enable the user for Mobile Capabilities features. Instead, create a new user and grant that user access to Mobile Capabilities features. If you enable Mobile Capabilities features for an existing user with the Shop Switcher, the user's access is permanently disabled for other shops.
-
In RepairCenter, click More, and then click Configuration.
-
Click the Application Access tab.
-
Select the desired user in the User list.
-
Review the user's email on the Contact Information tab and ensure the email is up to date.
Note: The user's email must be unique and cannot already exist for another user in RepairCenter.
-
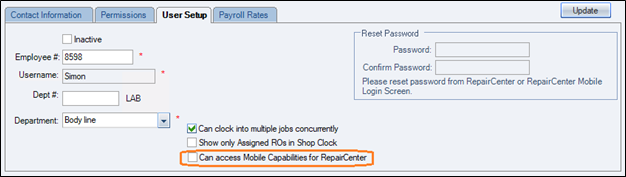
Click the User Setup tab.
-
Select the Can access Mobile Capabilities for RepairCenter check box.
-
Review the warning prompt, and click OK.
-
Click Update.
-
Click Send Mobile Access Email.
-
Click OK at the prompt.
-
The user must sign in to RepairCenter and complete the registration form.
RepairCenter Administrators can create new users and grant mobile access using the steps below. Once the steps are completed, the user must sign in to RepairCenter and complete the registration form.
-
In RepairCenter, click More, and then click Configuration.
-
Click the Application Access tab.
-
Click New.
-
Enter the user's contact information on the Contact Information tab. Required fields are labeled with a red asterisk.
Note: The user's email must be unique and cannot already exist for another user in RepairCenter.
-
Click the Permissions tab and apply appropriate permissions.
-
Click the Payroll Rates tab and apply rates if available.
-
Click the User Setup tab.
-
Select the Can access Mobile Capabilities for RepairCenter check box.
-
Review the warning prompt, and click OK.
-
Click Update.
-
Click Send Mobile Access Email.
-
Click OK at the prompt.
-
The user must sign in to RepairCenter and complete the registration form.
Once a RepairCenter Administrator grants access, the user must sign in to RepairCenter, acknowledge access, and complete the registration form.
-
Sign on to RepairCenter desktop.
-
At the prompt, click OK to generate a new user name and password for both RepairCenter Desktop and RepairCenter Mobile Capabilities access.
-
Review the Confirm Shop Switcher prompt. If you are using the Shop Switcher, contact your administrator and request a new account. If you are not using the Shop Switcher, click OK.
-
If your shop is already configured for the Mitchell Connect application, the Select or Create New Username window shows a list of Mitchell Connect usernames.
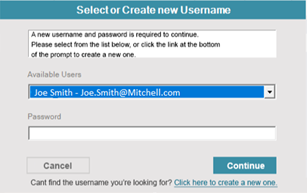
Do one of the following:
-
If your username appears, select it in the Available Users list, enter your Mitchell Connect password, and click Continue. The user successfully mapped with existing connect credentials and RepairCenter restarts.
-
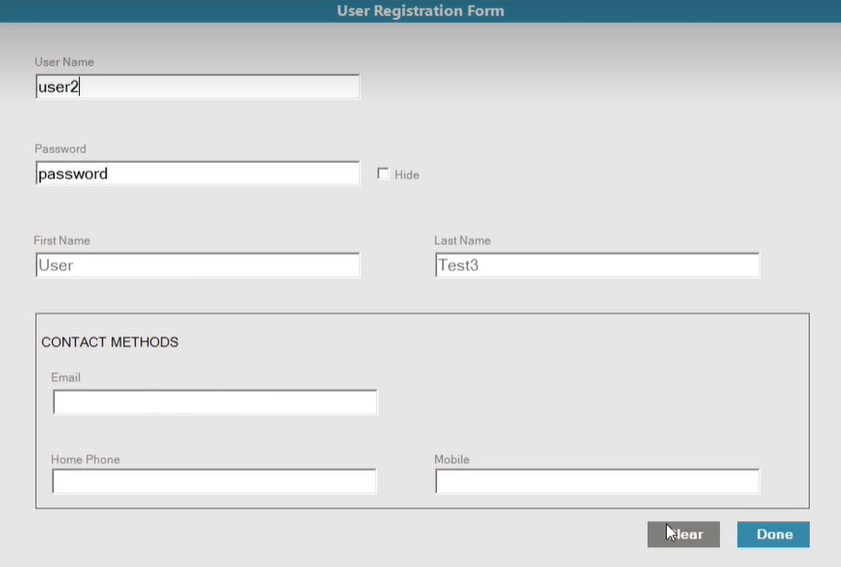
If your username does not appear, click Click here to create a new one link. The User Registration Form appears. Enter a new Username and Password, and then click Done.
-
Restart RepairCenter and sign in.
-
Review the email sent to you at the beginning of the process. Use the link in the email to access Mobile Capabilities for RepairCenter application and sign in with your user name and password.
Note: The new username and password is automatically updated for the existing RepairCenter user. Old usernames and passwords will no longer be available. There are no changes in the employee access permissions and payroll rates.