Tasks
Use Tasks to assign activities like making phone calls or ordering parts. Tasks are specific to the open Repair Order or Opportunity. When you assign tasks, you can use the Calendar feature to ensure shop employees are available for a given Task.

How to
- From an open Repair Order or Opportunity, click the Activity tab.
- Click the Tasks subtab. The Tasks subtab displays a list of tasks assigned to you that are specific to the open RO or Opportunity.
View all Tasks assigned to you including tasks not associated with a Repair Order or Opportunity. Do one of the following:
-
From the Tasks menu, select My Tasks.
- From the Whiteboard, you can click the Tasks icon
 to display a list of all your assigned tasks.
Tip: The Tasks tab is the same in functionality for both a Repair Order and an Opportunity.
From the Tasks tab, select the following in the View list to filter your tasks:
- Open - Tasks that have not yet been marked Completed.
- Callbacks - Tasks that have been marked as Callback tasks.
- Completed - Tasks that have been marked as Completed.
- Assigned - Tasks that were created by someone else and assigned to you.
- In an opened RO or Opportunity, click the Activity tab. The Tasks subtab should be selected by default. If it is not, click the Tasks tab.
- In the upper right corner, click Add Task. This clears the variable fields in the lower portion of the window.
- In the lower left, select the task Name from the drop-down list.
- Select your name in the Assigned to list.
- Verify or set the Due date and time.The current date and time is automatically entered. You can change each part of the date and time.
- Click anywhere in the date field, and then click the drop-down arrow to open a calendar. Select a new date.
- To change the time, click the hour, minutes, or seconds and use the up and down arrows to increase or decrease the number.
- Indicate the Recurrence of the task:
- One time
- Daily
- Every 2 days, every 3 days, every 4 days,
- Weekly
- Monthly
- If the Task requires a phone call, select the check box next to CallBack Task.
- If the Task is related only to the open Repair Order, select the Applies to this Job check box. The RO or Opportunity number displays if this check box is selected.
Note: If this check box is not selected (the task is not specifically for the open RO or Opportunity), the new task will not appear in this list; you can find it only in your My Tasks list, accessed from the Tasks menu.
- Type additional notes in the Details box, as needed.
- Click Update.
Tip: If you have Administrator rights, you can also view the new task on the All Tasks tab list accessed from the Tasks menu.
- In an opened RO or Opportunity, click the Activity tab. The Tasks subtab should be selected by default. If it is not, click the Tasks tab.
- In the upper right corner, click Add Task. This clears the variable fields in the lower portion of the window.
Tip: Use the Calendar to determine if your staff is available to complete the task.
- In the lower left, select the task Name from the drop-down list.
- Select the desired user in the Assigned to list.
- Verify or set the Due date and time.The current date and time is automatically entered. You can change each part of the date and time.
- Click anywhere in the date field, and then click the drop-down arrow to open a calendar. Select a new date.
- To change the time, click the hour, minutes, or seconds and use the up and down arrows to increase or decrease the number.
- Indicate the Recurrence of the task:
- One time
- Daily
- Every 2 days, every 3 days, every 4 days
- Weekly
- Monthly
- If the Task requires a phone call, select the check box next to CallBack Task.
- If the Task is related only to the open Repair Order, select the Applies to this Job check box. The RO or Opportunity number displays if this check box is selected.
Note: If this check box is not selected (the task is not specifically for the open RO or Opportunity), the new task will not appear in this list; you can find it only in your My Tasks list, accessed from the Tasks menu.
- Type additional notes in the Details box, as needed.
- Click Update.
- Click Calendar to open the calendar.
- Do one of the following:
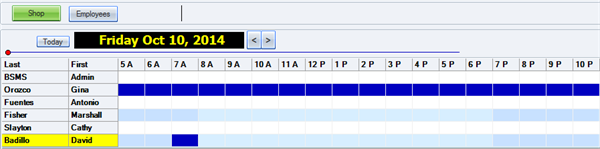
- Click Employees to view employee availability.
- Click Shop to view availability for the entire shop.
- Review availability. Items in dark blue indicate the employee has a Task assigned.
- Use the Calendar controls to move to different days
 . Click Today to view today's information.
- Click
 in the upper right corner, to close the Calendar.
Tip: See Calendar View for more information about the Calendar.
- Select the Task in the list and make the changes as needed in the bottom portion of the window.
- Click Update to save the changes.
- On the Tasks tab window, highlight the completed task line.
- In the Completed column, right-click and then choose Mark Complete from the drop-down menu.
Tip:You can view deleted tasks by selecting Completed on the View list.
- Select the task from your task list.
- Click Reply, and add your text in the Details box.
- Click Update to send the reply.
- Select the task from the list and then click E-Mail. This opens your default e-mail application.
- If an RO has been selected, the RO number and customer name automatically appears in the Subject line. You can leave the subject as it is, or change it manually.
- Complete and send the email as usual.
- Click Print All Tasks. A Preview of the Task Report displays
Note: The report only shows Tasks in the same category selected in the View list. See Filter Task View to change your view.
- From the report preview, click
 .
. - Click in the upper right corner, to close the preview.
This feature is available for customers licensed for Carrier Communications.
In most instances, the shop writes the estimates for the carrier. The Special Actions feature will be used by carriers that require the shop to notify them when the vehicle arrives at the shop. It alerts the carrier that the estimate can now be written.
Reference
| Column | Description |
|
Date/Time |
Date and time the task was created or assigned. |
|
Task |
Name of the Task. |
|
C |
Call - if the task is a phone call, an asterisk appears in this column. |
|
Job Reference |
If the task is job-oriented, the RO/Opportunity number appears in this column. |
|
Last |
Last name of the customer. |
|
F |
First initial of the customer. |
|
Completed |
Date the task was completed. |
|
Phone 1 |
Primary phone number of the customer. |
|
Phone 2 |
Secondary phone number of the customer. |
|
E |
E-mail - if the task includes sending an e-mail, an asterisk appears in this column. |
|
Assigned By |
Person who assigned the task. |
|
Assignment Status |
Current status of the task. |
|
Fields/Button |
Description |
|
View |
Select which tasks you want to see in the list: all Open tasks, tasks that require a Callback, tasks that are Completed, or tasks that are Assigned to you. |
|
Add Task |
Allows you to add a new task and assign it either to yourself or another employee. |
|
Print All Tasks |
Click to print a list of all tasks. |
|
Calendar |
Click to open a calendar showing the availability of shop employees. |
|
Mark Complete |
Select a task from the list, and then click here to mark it as completed. |
|
|
To send a task in an e-mail, select the task from the list, and then click here to open your e-mail application. |
|
Reply |
Available only if the task was assigned to you by someone else. Select the task in the list, and then click here to send a Reply to the assigner. |
|
Delete |
Select a task from the list, and then click here to delete it. |
|
Name |
This field is the name of the task. Select from the drop-down list or type in another name. |
|
Assign To |
This field is automatically populated with the logged-on user's name. If the task is to be assigned to someone else, select their name from the drop-down list. When the task is saved, the Assigned by: field is automatically populated with the logged-on user's name. |
|
Due |
The current date and time is automatically entered. Change the date by clicking the drop-down arrow to open a calendar. Change the time by clicking on the hour, minutes, or seconds, and then using the up/down arrows to increase or decrease the selected number. |
|
Recurrence |
Select how often the new task should be performed. |
|
CallBack Task |
Select this check box to indicate a task that involves a phone call. |
|
Applies to this Job |
Select this check box if the new task is specific to the open RO or Opportunity. If the task does not apply to the open RO or Opportunity, it can only be viewed in the My Tasks tab, accessed from the Tasks menu. |
|
Special Actions |
Used by carriers that require the shop to notify them when the vehicle arrives at the shop. It alerts the carrier that the estimate can now be written. |
|
Details |
Enter the details of the task in this text box. |
|
Save/Update |
Click to save a new task or update changes made to an existing task. |
| Shop View | Employee View |
|
|
| In the Shop view, the employee names are listed on the left, and the day is split into hourly units to the right of each name. |
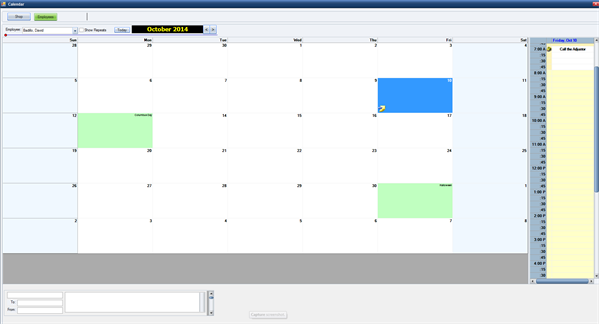
The Employees view gives you a monthly look at how work is distributed. |
|
Select a day on the calendar to view that day's individual tasks in the list on the right. Click on a task to view the details in the area at the bottom of the tab. |
|
| In the Employee: field in the upper left, select an employee to see only his/her tasks, or select All to see all assigned tasks. |