Record Credits
Use the Credits tab under the Parts tab to record and post a credit. When you process a return, the returned part is tracked in this tab; the credit memo that you receive from the vendor is also posted here.
The Credits tab is available if you have the Parts module licensed.
How to
Credit memos should contain items for a single repair order. If a vendor issues credit memos for items used on multiple repair orders, contact them and request a separate credit memo for each RO.
- On the Whiteboard, double-click the RO, click the Parts tab, then click the Credits tab.
- Highlight the line or lines for which you have received the credit memo.
- Confirm or enter the vendor's Invoice date.
- In the Credit area at the bottom of the tab, enter the Credit Memo Number.
- Confirm that the Invoice Cost figure is correct and matches the invoice. (If there is a difference due to fuel and/or restocking fees, see below.)
- If there are notes to add to this credit memo, add them in the Credit Memo Notes field (Damaged Part Credit, Core ADJ, etc.).
- If requested by Accounting, clear the Send to Payables check box.
- Confirm or enter the Pickup Date.
- Click the Post button on the right.
A credit memo can be voided if it has not yet been posted to Accounting. You must have the proper access rights in order to void a credit.
- On the Whiteboard, double-click the RO, click the Parts tab, then click the Credits tab.
- Highlight the credit to be voided.
- Click the Void button at the bottom of the tab. The line color changes to red, indicating that it has been voided.
- Re-process the credit, if appropriate.
Track all core charges for which you expect to receive credit.
Core Charges Returned for Credit
- Add the part (core charge) and immediately return it for credit.
- Follow the instructions for Unordered Parts.
- Post the credit memo in the same way you normally would, except note that it is a core charge.
Core Charges that Cannot be Returned for Credit
Example: A core charge was added, posted, and returned. The vendor now states that the core is too damaged to receive credit. To bill the customer/insurance company, the core charge must be added to the estimate.
- The estimator must add the core charge to the estimate in the estimating system.
- From the Whiteboard, select the RO and click the Accept Supplement button at the bottom of the tab.
- Order the core charge.
- Receive the core charge using Core Adj as the invoice number.
- The list price and the cost will be the same amount.
- Use the current date as the invoice date.
- Select the Parts tab, then the Credits tab.
- Receive a credit memo for the returned core charge using Core Adj as the credit memo number.
- Use the current date as the credit memo date.
- In the Create section at the bottom of the tab, confirm or enter the Pickup Date; click the Post button on the right.
Note: When adding the core charge in your estimating system, confirm that the part type is the same as the core charge that was originally added; process the return in RepairCenter.
Example: You purchase a front clip for $3700 from a salvage vendor. There are approximately $200 worth of parts missing from the clip, which had to be purchased from an OEM vendor. The salvage vendor agrees to reimburse you for the cost of the OEM parts. Here's how you would handle this type of situation.
- From the Parts tab, select the Order tab.
- Click the Add Part button on the right and add parts to the order from the OEM vendor.
- Order the parts from the OEM vendor.
- When received, post the parts on the invoice, as usual.
- Under the Parts tab, click the Credits tab. Click the Add Credit button on the right. Using the information from the OEM invoice, process a credit from the salvage vendor for the amount of the OEM invoice.
- Use the same part category as used in the Add Part feature (usually OEM).
- Enter the description "Credit due for OEM parts."
- When the credit memo is received from the salvage vendor, process it as usual.
The vendor may deduct a restocking fee or fuel surcharge from the amount of the credit memo you have requested. There are two ways to process these charges. For both of the procedures that follow, we assume that you are adjusting the cost of the restocking fee or fuel surcharge to parts cost, and that you do not intend to track the sales and cost of these items separately.
To Not See the Charges Reflected on the Credit Tab
- Open the RO, then select the Parts > Credits tab.
- Double-click the line in the Cost field.
- Change the cost to the amount received, per the credit memo.
- Post the credit memo as usual.
To See the Charges Reflected on the Credit Tab
- Open the RO, then select the Parts tab, then the Credits tab.
- Click the Add Credit button on the right.
- Enter all appropriate fields marked by a red asterisk *.
- Select the part type per the original returned part.
- Enter the description "Restocking Fee" or "Fuel Surcharge."
- When entering the amount, place a minus sign before entering the amount. This will post as a debit, thus adjusting the amount of the credit memo.
- Click OK.
- Select the two lines and click the Post button on the right, as usual.
Reference
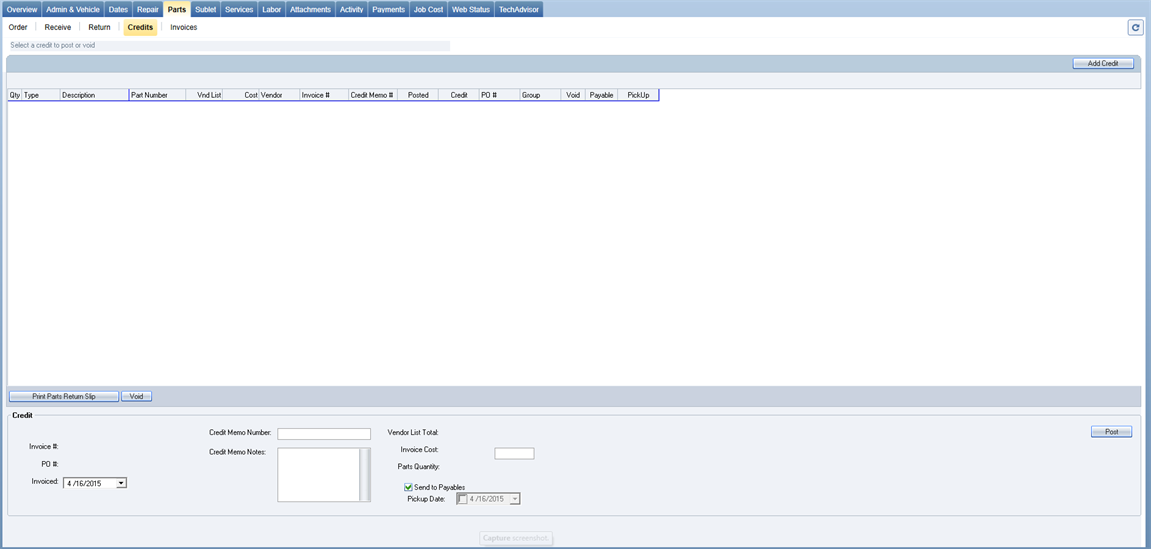
| Field Name | Editable | Description |
|---|---|---|
|
Note: For abbreviated column headings, roll your cursor over the heading to see the full name or description. |
||
|
Columns |
||
|
Qty |
N |
Quantity of part needed. |
|
Type |
N |
The part type (New, Used, AM, etc.). Prior to ordering the part, the type can be edited by double-clicking in the column and selecting a different type from the drop-down menu. Once the part has been ordered, the type cannot be changed. |
|
Description |
N |
Name of the part as designated in your estimating system. |
|
Part Number |
N |
Part number as entered in the receive process. |
|
Vnd List |
N |
The actual list price as provided by the parts vendor. You can change it by double-clicking and typing in a new amount. |
|
Cost |
Y |
Your cost, as provided by the vendor (the amount is calculated for you, but may be changed if necessary). You can change it by double-clicking and typing in a new amount. |
|
Vendor |
N |
The part supplier. When the part is ordered, the vendor name appears in this column. You can also double-click to manually add the vendor to the line, or change to a different vendor. |
|
Invoice # |
|
The invoice number on which the part was received. |
|
Credit Memo # |
|
The number assigned to the credit memo. |
|
Posted |
|
The date the part was returned. |
|
Credit |
|
The date the credit was received. |
|
PO # |
|
The purchase order number populates this column when the part is ordered. RepairCenter generates the PO number from the RO number, adding a sequential number (123-1, 123-2, etc.) for each subsequent parts order. Once the order is placed, you can change this number by right-clicking on the line and selecting Change PO. |
|
Group |
|
For CCC One® users only: If parts are selected from a group in the estimating system, that information displays here. |
|
Void |
|
Denotes if a credit memo has been voided. |
|
Payable |
|
A "Y" or an "N" indicates whether or not the entry is payable. |
|
PickUp |
|
Date the vendor picks up the part or the date the returned part is delivered back to the vendor. |
|
Buttons |
||
|
Add Credit |
|
Click to add a new credit. For example, add credit for core charges (see above). |
|
Print Parts Return Slip |
|
For the part selected in the list, click to display the Parts Return Slip on
the screen. To send it to the printer, click the printer icon |
|
Void |
|
Click to void a credit memo. (See above.) |
|
Credit Area |
||
|
Note: If the highlighted part line has been credited, these fields are read-only. |
||
|
Invoice # |
N |
The invoice number on which the selected part was originally received. |
|
PO # |
N |
The purchase order number on which the part was ordered. |
|
Invoiced |
Y* |
The date of the vendor's credit memo. |
|
Credit Memo Number |
Y* |
Enter the credit memo number for the selected part or parts. |
|
Credit Memo Notes |
Y* |
Before completing the credit memo, you have the option of adding notes. |
|
Vendor List Total |
N |
The amount as reflected in the Vnd List column. |
|
Invoice Cost |
N |
This is the amount shown in the Cost column. |
|
Parts Quantity |
N |
This number shows how many parts lines you have selected. |
|
Send to Payables |
Y* |
Select or clear this check box, as instructed by Accounting. |
|
Pickup Date |
|
Date the vendor picks up the part or the date the returned part is delivered back to the vendor. |
|
Post |
|
Once all the required information has been entered, click to finalize the credit memo. |