Receiving Parts - Core Charges and Invoices
Use the Receive tab under Parts to record which parts have been received. You can also void invoices, process core charges, adjust quantities, return ordered parts, and add charges for restocking.
Note: The Receive tab is visible if you have the Parts module licensed. Refer to Part Settings to determine how your shop has been configured.
As you receive parts, the Whiteboard and the Overview tabs are updated to show the percentage of parts that have been received. In addition to updating the Whiteboard, the invoices you create can be posted to Accounting.
How to
- Work from the invoice that accompanies the parts that were physically received.
- Once you verify that you have received each part listed on the invoice, record parts receipt; then validate the list and cost of each part.
Note: If the vendor discount percentage (P%) is not calculating correctly, view your vendor file to confirm that there is no markup percentage or that the option is enabled to discount instead of markup.
- Work with one invoice at a time.
- Enter the invoice total in the Invoice Cost Diff: field in the Receive area of the Receive tab, prior to marking any parts as received. As you identify each part as received, the Invoice Cost Diff amount is reduced. Once all parts have been received and price adjustments made, the value will show zero if the invoice is in balance.
Note: Invoices should contain items for a single repair order. If a vendor issues invoices for items used on multiple repair orders, contact them and request separate invoices for each RO. If the vendor does not separate the invoice for each RO, contact your Accounting department for the process to follow prior to posting.
- If your shop pays sales tax on part invoices, contact your Accounting department for the process to follow prior to posting.
Note: All parts posted on an invoice must contain the same PO number. If the invoice will not balance, adjust all the PO numbers so they are exactly the same; right-click the line and select Change PO. (If you right-click and copy the correct PO number, you can then paste it into the incorrect line or lines.)
Note: If parts are back-ordered (B), or you owe parts to customers (IOU), be sure to check the box in the Order tab to update the status of the parts on the Whiteboard.
There are several ways to access the Receive tab under the Parts tab. Select your preferred method and use it consistently to speed up accessing the proper tabs.
- On the Whiteboard, double-click an RO to open it. Click the Parts tab, then click the Receive tab.
- On the Whiteboard, if the preview pane is showing in the lower half of the window, click the Parts link, then click the Receive tab.
- On the Whiteboard, click the Open drop-down arrow and select Parts, then click the Receive tab.
- On the Whiteboard, right-click anywhere in the list and select Open to. Click Parts, then click the Receive tab.
- In the Overview tab of an open RO, click the Parts link, then the Receive tab.
- Access the Parts tab directly from the Whiteboard by double-clicking an RO in the list, then click the Receive tab. This is the preferred method from parts managers and is available only if the Department in your User Setup is set to Admin-Parts.
- Access the Receive tab under the Parts tab.
- In the Receive area at the bottom of the tab, enter the Invoice Date and Invoice #; then enter the invoice cost in the Invoice Cost Diff field.
- Double-click in the Qty column of the line for the part received. The Part Data Entry window appears.
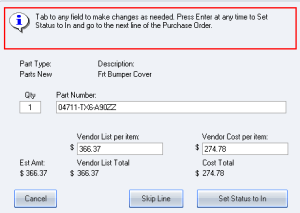
- Verify that the Qty, Part Number, Vendor List per item, and Vendor Cost per item fields are entered accurately. If you need to make changes, do the following.

- Tab to the Part Number field and enter the correct part.
- Tab to the Vendor List per item field and enter the amount for the part. (If you change the Vendor List per item amount, the system will display a Parts Price Change (PPC) indicator on the Whiteboard and the Overview tab, to be reviewed by the estimator.
- Tab to the Vendor Cost per item field and enter the cost of the part from the invoice. If the vendor was set up with an expected discount, the cost is automatically calculated based on the expected discount.
- Press Enter to change the status from Ordered to In and move to the next line in the purchase order.
Tip: If there are no changes needed in the Part Data Entry window, press Enter at any time to Set Status to In and go directly to the next line of the purchase order.
- Repeat steps 4 and 5 for each part, until each part on the invoice has been received and the Invoice Cost Diff field is zero.
- If the invoice has already been paid (COD), do one of the following:
- If the invoice contains only two parts, place a check mark in the P column for each part paid.
- If the invoice has multiple parts that are all pre-paid, clear the Send to Payables check box at the bottom of the tab.
- When the invoice is balanced, click Receive. The part status changes from In to Posted.
- Access the Receive tab under the Parts tab.
- In the Receive area at the bottom of the tab, enter the Invoice Date and Invoice #; then enter the invoice cost in the Invoice Cost Diff field.
- Do one of the following:
- If the part lines are in sequence, click the first line and drag the cursor to the last part line.
- If the part lines are not in sequence, hold down the Ctrl key and click each line to be received.
- Click Set Parts Status to In.
- Confirm or enter the Part Number, Vnd List, and Cost fields for each line. Make changes if necessary, to provide Parts Price Changes (PPCs) to be reviewed and processed by the estimator.
- If the invoice has already been paid (COD), do one of the following:
- If the invoice contains only one or two parts, place a check in the P column for each part paid.
- If the invoice has multiple parts that are all pre-paid, at the bottom of the tab, clear the Send to Payables check box.
- When the invoice is balanced, click Received. The status for each part received changes from In to Posted.
If a part invoice has been incorrectly posted, you can void the invoice. However, you must have the appropriate access rights to void an invoice.
Note: If you attempt to void an invoice that has already been posted to Accounting, you will receive a message to contact your Accounting staff. The invoice will need to be marked as "not transferred" prior to voiding the invoice.
- To access the Invoices tab, do one of the following:
- On the Whiteboard, double-click the RO to open it. Click the Parts tab, then click the Invoices tab.
- On the Whiteboard, if the preview pane is showing in the lower half of the window, click the Parts link, then click the Invoices tab.
- Highlight the invoice line to be voided.
- Click Void. In the confirmation message, click Yes. The line displays in red.
- Go to the Receive tab and re-enter the invoice as needed.
You can either process a core charge that can be returned for credit or process a core charge that cannot be returned for credit.
- Receive all the parts on the invoice as usual.
- Click Add Part to add the core charge.
- Select the category of the part that has the core charge.
- In the description, enter "Core Charge."
- Apply this to the PO for the other parts on the invoice.
- Enter the list and cost as the same amount.
- Balance the invoice as usual.
- Click the Return tab.
- Select the added Core Charge line.
- Select the line the reason Core Charge, and then click Return. A Note will automatically be generated.
- A return slip can be printed as needed.
Note: The above process will create a P+ indicator on the Whiteboard. The indicator can only be cleared by deleting the core charge line after it has been returned. You must have the proper access rights to delete a part. This is usually done at pre-close.
Some core charges cannot be returned for credit. For example: A core charge was added, posted, and returned, but the vendor states that the core is too damaged to be returned.
- The estimator will add the core charge to the estimate.
- The estimator will Accept the Supplement in RepairCenter.
- Order the core charge.
- Receive the core charge, using "Core ADJ" as the invoice number. The list and cost will be the same.
- Use the current date as the invoice date.
- Click the Credits tab.
- Receive a credit memo for the returned core using "Core ADJ" as the credit memo number.
- Use the current date as the credit memo date.
- Post the credit memo.
Note: if you identify that the core cannot be returned prior to posting the invoice, have the estimator enter the core charge on the estimate. After the Accept Supplement has been processed, order the core charge and receive the part as you would on any invoice.
If you have an invoice with both a part and a sublet item, the invoice needs to be treated as a split invoice. For example: An invoice from a sub-contractor for a windshield installation that also includes the necessary parts should be handled as a split invoice.
- On the paper invoice, write the words "Split Invoice."
- Double-click the RO on the Whiteboard, click the Parts tab, then click the Receive tab.
- Receive the parts portion of the invoice. For the Invoice Cost Total, enter only the total of the parts amount, not the entire invoice (which also includes a sublet amount).
Tip: Add a P after the invoice number (e.g., 123P) to differentiate it from the Sublet invoice.
- Receive and post as usual.
- Click the Sublet tab.
- For the amount, enter only the amount of the sublet from the invoice.
Tip: Add an S after the invoice number (e.g., 123S) to differentiate it from the Parts invoice.
- Complete the invoice information requirements and post the sublet invoice.
If parts are received damaged, but you decide to repair the parts and use them, you should use the following three-step process.
- Receive the part as usual using the correct vendor list and cost as it is reflected on the invoice. If there are multiple parts on the invoice, receive and post all of the parts.
- Create and credit the damaged parts by clicking the Credits tab under the Parts tab.
- Click Add Credit.
- Enter all applicable information in fields marked by a red asterisk*.
- Enter the negotiated credit amount for the damaged part in both the Vnd List Amt and Cost Amt fields.
- Click OK.
- Click Print Parts Return Slip to produce a return slip.
- If the vendor only lowers the invoice amount instead of issuing a credit memo, click Post to create a credit memo at this time.
- Add supplemental labor by completing the following steps. Doing this will flag the RO on the Whiteboard and the Overview screen to indicate that supplemental labor has been added. In the case of a damaged part, the RO will be closed with these flags present.
- From the Overview screen, click the Labor tab, then select the Assign Technicians tab.
- Click Add Supplement Labor.
- Select Body as the Dept and complete the remaining required fields. A new line will be entered on the work order.
- Select the new line that was just created.
- Select the check box next to the technician's name.
- Click Assign.
- Re-print the work order for the technician.
Example: A shop purchased a front clip for $3700 from a salvage vendor. There is approximately $300 worth of parts missing from the clip that had to be purchased from on OEM vendor. The salvage vendor agrees to reimburse the shop for the cost of the OEM parts.
- From the Parts tab, click Add Part and add parts to the order from the OEM vendor.
- Order the parts from the OEM vendor.
- When received, post the parts on the invoice as usual.
- Under the Parts tab, click the Credits tab, then click Add Credit. Using the information from the OEM invoice, process a credit from the salvage vendor for the amount of the OEM invoice.
- Use the same part category as used in the Add Part feature (usually OEM).
- Use the description "Credit due for OEM parts."
- When the credit memo is received from the salvage vendor, process it as usual.
If a parts order is received containing a part that is not on the estimate, was not ordered, and will not be needed, the part must first be added to the RO in order to balance the invoice; a return slip must then be generated.
- To access the Receive tab, do one of the following:
- On the Whiteboard, double-click the RO to open it. Click the Parts tab, then click the Receive tab.
- On the Whiteboard, if the preview pane is showing in the lower half of the window, click the Parts link, then click the Receive tab.
- If the order has parts that need to be received, receive all the parts as usual, but do not click Receive.
- For the part that is not ordered and not needed, click Add Part.
- Enter the required fields.
Note: The Part Number is optional. If it is entered, it will print on the Part Return Slip. (Most vendors require the part number on returns if using return slips produced by RepairCenter.)
- Receive the newly-added part as usual.
Note: If your shop's part settings are set to only show ordered parts on the Receive tab, order the part before receiving it.
- Enter 0.00 in the Vnd List field.
- In the Cost Total column, enter the cost that appears on the actual invoice.
- Double-click the Vendor space, and select the vendor from the vendor list.
- Change Status to In.
- To receive the invoice, click Receive.
- Select the Parts Return tab.
- Highlight the line that you just added, select a reason in the Return Reason list, then click Return.
- A Return How message appears. Do one of the following:
- Select Yes if you will be re-ordering the part. The Status of he part is changed to Returned.
- Select No if the part will not be re-ordered. The Status of the part is changed to Returned/Zero and you will not have an option to re-order the part. It will, however, show as an unordered part on the Whiteboard and Overview tab, unless you change the status to Maintain.
- When the credit memo is received from the vendor, enter "Damaged Part Credit" in the credit memo note field prior to posting. This will generate a note on the Note tab.
Freight, restocking, and fuel charges can be added to an invoice whether the customer is being charged or whether the repair shop is absorbing the costs.
To charge the fees to the customer:
- Return to estimating (RepairCenter Estimating or third-party estimating application).
- Accept the supplement to RepairCenter.
- Receive and balance the parts invoice as usual.
To charge the fees to the repair shop:
- Click the Receive tab under the Parts tab.
- Receive all parts.
- Add the charge to the most expensive part cost.
- Add a note explaining the reason that the shop is absorbing the cost and why the line profit is less than normal.
- Balance and post the invoice as usual.
If the quantity of parts received is more than the quantity ordered:
- Receive the quantity of parts.
- Update the estimating system with the correct quantity to be included in a supplement.
If the quantify of parts received is less than the quantity ordered, choose one of the following options based on the manager's preference.
Option 1:
- Change the quantity and receive the invoice as usual.
- Notify the estimator that the line in the estimate needs to be changed to match the amount received and that another line must be added for the remaining items.
- Accept the Supplement in RepairCenter.
- Order the new supplement line, but do not send the purchase order.
Option 2:
- Change the quantity to the number received and receive the invoice as usual.
- In the Receive tab, click Add Part to add a line to receive the remaining quantity when they are received.
Note: With Option 2 above, you will have to add these two vendor amounts together to make sure they equal the estimate amount on the original line. The Supplement part added indicator can never be removed from the Whiteboard.
Reference

Tip: Column headings are abbreviated. Point to the heading to see the full name or description.
|
Field Name |
Editable |
Description |
|
Qty |
Y |
Quantity of part needed. |
|
Type |
Y |
Part type (New, Used, AM, etc.). Prior to ordering the part, the type can be edited by double-clicking in the column and selecting a different type from the drop-down menu. Once the part has been ordered, the type cannot be changed, but the order can be canceled to allow a change. |
|
Description |
N |
Name of the part as imported from your estimating system. |
|
Part Number |
Y |
Part number as imported from your estimating system. You can change it by double-clicking and typing in a new part number. |
|
Estimate |
N |
The expected list price as determined by your estimating system or as entered on a manually-created RO line. If a line discount has been applied, this amount is shaded yellow. |
|
Vnd List |
Y |
The list price as provided by the parts vendor. You can change it by double-clicking and typing in a new amount. |
|
Cost |
Y |
Your cost, as provided by the vendor (the amount is calculated for you, but may be changed if necessary). You can change it by double-clicking and typing in a new amount. |
|
Vendor |
Y |
The part supplier. When the part is ordered, the vendor name appears in this column. If not ordered, you can double-click to manually add the vendor to the line. |
|
P% |
N |
Shows the actual discount for each part that has a vendor and cost. A 25% markup will read as a 20% discount, as described in Profit Calculation. Markups are calculated on cost and discounts are calculated on list. |
|
Status |
Y |
Status of the part: Ordered, Not Ordered, Back Ordered, Inventory, Maintain, In, Removed, Hide, and On Hold. The Status can be changed by right-clicking in the column and selecting from the drop-down list. It can also be changed by right-clicking and selecting Change Status. For back-ordered or IOU parts, a status of B or I displays on the Whiteboard under the PS column. |
|
P |
Y |
If the part is paid for by Cash On Delivery (COD), select this check box prior to clicking Receive. With this check box selected, the invoice is highlighted in yellow in the Accounting Payables tab. This alerts the person transferring data to Accounts Received that the invoice should not be transferred. |
|
C |
Y |
Indicates whether the part is a Critical part or not. If a part is a critical part, that status appears on the purchase order. |
|
I... |
Y |
IOU - A part still owed to the customer. Marking a part as IOU provides the ability to print an IOU receipt for the customer. (See We Owe/IOU Parts.) |
|
B |
Y |
Indicates the part has been back-ordered. |
|
PO# |
Y |
The purchase order number populates this column when the part is ordered. RepairCenter generates the PO number from the RO number, adding a sequential number (123-1, 123-2, etc.) for each subsequent parts order. Once the order is placed,you can change this number by right-clicking on the line and selecting Change PO. |
|
Invoice # |
Y |
When the part is received, the vendor invoice number appears here. |
|
Orig Invoice # |
N |
The original invoice number appears here when you return a part. If the part is re-ordered and re-received, the invoice number for the originally received part is retained in this field. |
|
Orig Cost |
N |
The original cost of the part appears here if you have returned a part. |
|
Group |
N |
For CCC One® users only: If parts are selected from a group in the estimating system, that information displays here. |
|
Line |
N |
The line reference number, which also appears on the purchase order. You and your parts vendor may refer to it regarding any parts on a purchase order. |
|
Vnd List per item |
N |
The vendor list per item. |
|
Bin |
Y |
If the shop uses bin numbers, this column indicates the location of the part in the shop. You can change it two ways: 1) Double-click the field and type in a new value, or 2) With the line highlighted, right-click and select Change Bin. A small dialog box appears that allows you to enter a different bin number. |
|
Ordered On |
N |
Date the part was ordered. |
|
Markup |
N |
Your cost plus any markup that was applied to used parts. |
|
S# |
N |
If the part was added to the RO as a result of a supplemental estimate, the supplement number appears here. |
|
D/M |
N |
If there was a line discount or markup applied in the estimating system, the discount or markup percent shows here. |
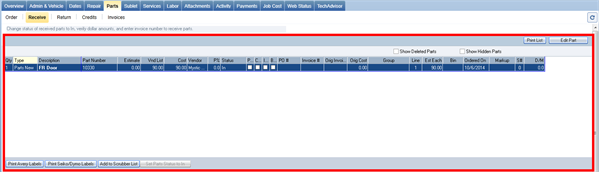
| Field/Item | Editable | Description |
|
Print List |
|
Click to print a report showing the entire parts list. The report displays on the screen; click the printer icon |
|
Add Part |
|
Click to manually add new parts to the RO. (This is a licensed option.) |
|
Show Deleted Parts |
Y |
If selected, parts that have been deleted are included in the list. Deleted parts are displayed in red. |
|
Show Hidden Parts |
Y |
If selected, parts that have been hidden are shown in the list. Hidden parts show Hide in the Status column. |
|
Print Avery Labels |
|
If you use Avery labels, click to print the highlighted part(s) on Avery labels. |
|
Print Seiko/Dymo Labels |
|
If you use a Seiko or Dymo label printer, click to print the highlighted parts on the appropriate label. |
|
Add to Scrubber List |
|
Adds the selected part to the scrubber. |
|
Set Parts Status to In |
|
Click to change all of the highlighted parts being received to In status. |

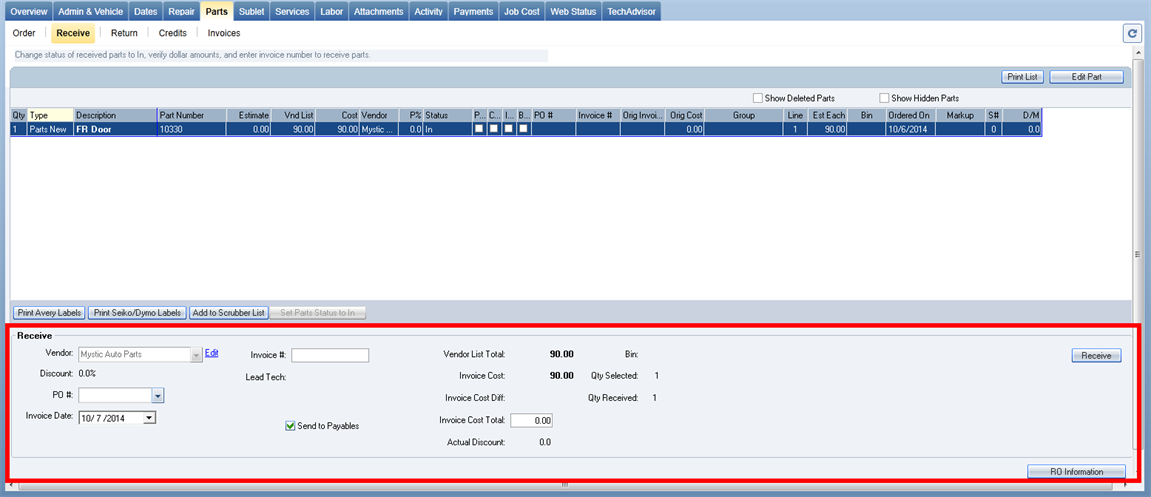
Note: If the highlighted part line has been received, these fields are read-only. When you leave the Receive tab and then return, the received and posted parts are no longer listed here.
| Field | Editable | Description |
|
Vendor (Edit) |
Y |
The vendor from whom you are ordering the highlighted part or parts. Click Edit next to the vendor name field to view the vendor list. |
|
Discount |
N |
The discount you receive from the selected vendor. |
|
PO # |
Y |
The purchase order number. RepairCenter generates the PO number from the RO number, adding a sequential number (123-1, 123-2, etc.) for each subsequent parts order. Once the order has been placed, you can change this number by right-clicking in the PO# column in the parts list and selecting Change PO. The change will also occur in this PO # field in the Purchase Order section. |
|
Invoice Date |
Y |
Date on the vendor's invoice. |
|
Invoice # |
Y |
Vendor's invoice number. This number must be entered before parts can be received. |
|
Lead Tech |
N |
Non-editable field identifying the lead technician for this repair order. |
|
Send to Payables |
Y |
Select or clear this check box, depending upon whether or not payments have already been made. Clearing this check mark indicates that the invoice has been pre-paid and will be highlighted in orange in the Accounting Payables tab. This alerts the person transferring data to Accounts Received that the invoice should not be transferred. |
|
Vendor List Total |
Y |
The amount as reflected in the Vnd List column. |
|
Invoice Cost |
Y |
The amount shown in the Cost column. |
|
Invoice Cost Diff |
Y |
During the receiving process, enter the invoice total in this field. (See steps above.) |
|
Invoice Cost Total |
Y |
The total cost of the invoice. |
|
Actual Discount |
Y |
The actual discount applied to the invoice. |
|
Bin |
N |
For shops that use bin numbers for part storage; non-editable field identifying the location of the part in the shop. |
|
Qty Selected |
N |
This number shows how many parts lines you have selected. |
|
Qty Received |
N |
Number of parts received. |
|
Receive |
|
Click to complete the receive procedure. The Status of received parts changes to Posted. |
|
RO Information |
|
Click to see administrative and vehicle information associated with this RO. |