RepairCenter ToolStore
RepairCenter's ToolStore is the gateway to third-party add-on tools for the RepairCenter workspace. Browse and license third-party interfaces from the ToolStore, and access your licensed tools from the Tools menu. The ToolStore brings a wealth of new partner integrations to streamline and empower a shop's workflow.
- Real-time parts search and electronic parts procurement
- Two-way paint scale interfaces
- Customer communication and CSI tools
- Analytics and KPI reports
Our list of partners continues to grow so be sure to check in often to see what's new.
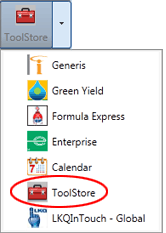
When ToolStore is first licensed and activated in RepairCenter, the menu icon looks like a toolbox. However, whenever an add-on has been activated, the Tools menu icon changes to reflect the most recently-utilized tool (see example below). For that reason, we will refer to the menu icon simply as the Tools menu.

Note: Every RepairCenter shop is licensed with the ToolStore. However, only those users with administrative privileges will see the ToolStore icon, can navigate to the ToolStore, and browse available third-party add-on tools. If a system administrator wants to grant add-on tool access to additional employees, this can be done by using the Add On Permissions tab in Configuration > Application Access > Security Groups. (See Setup section below.)
Note: Add-ons are provided by a third-party solution provider, and will require a separate relationship agreement between you and the provider. Add-on tools are not supported by Mitchell Technical Assistance Center (TAC). (See ToolStore Support below.)
How to
- From the top menu bar, click the Tools menu drop-down arrow.

- Displayed are the add-on tools for which you are already licensed.
- To browse the ToolStore for other available add-ons, click the ToolStore icon in the list.
- A Web site appears from which you can purchase new add-on tools.
- Click the link to a third-party provider for additional information.
- When the add-on has been licensed and activated, Mitchell will send you an e-mail notification that it is available for you to use. This may take several days.
- Once you are notified that the tool is available, refresh your licenses to see the latest additions to your workspace:
- Go to More > Configuration > Application Access > Licensing.
- In the lower right corner, click Check for New Licenses.
- All licensed tools are listed in the Tools menu. (See image for step 3 above.)
- Access to an add-on tool may appear in several other places, as well as in the menu list.
- Some add-on tools can be accessed from the Whiteboard list view.
- Some add-ons can be accessed from the global menus, such as Reports.
- Some add-ons can be accessed from the local job or opportunity tabs.


- If an add-on tool can be accessed on a tab, it can be launched from the tab or directly from the drop-down list.
- The first time you use an add-on, you may be required to configure the settings and establish the integration. Contact the tool provider for setup instructions.
- Once the setup is complete, you can begin using the add-on tool.
Only users with administrative privileges:
- Will see the ToolStore menu icon
- Can navigate to the ToolStore
- Can browse available third-party add-on tools
- Can access any licensed add-on tools
However, a system administrator can grant add-on tool access to additional employees by using the following instructions.
There are two ways to set up add-on permissions for your shop users:
A. If you use custom security groups for your shop roles (Best Practices):
- Go to More > Configuration > Application Access > Security Groups.
- Select the custom security group you wish to edit. (Note: You cannot edit a System group. If you do not wish to edit an existing custom group to include ToolStore privileges, create a new one for this purpose - see instructions for B below.)
- Click the Add-On Permissions tab. All licensed add-on tools will appear in this list.
- Select the desired add-on tools for the custom group selected in step 2.
- Repeat steps 2 through 4 for each custom group, as desired.
- Click Update. All employees in the custom group(s) now have access/visibility to the licensed add-on tools.
B. If you do not use custom security groups for your shop roles, you will need to create one:
- Go to More > Configuration > Application Access > Security Groups.
- Create a new custom security group.
- Click New.
- Enter the new Group Name. (For our example, we'll use "Generic Add-on User").
- Enter the new group Description. (For example, "Users have access to generic add-ons.")
- Click Create.
- Select the newly-created group.
- Click the Add-On Permissions tab. All licensed add-on tools will appear in this list.
- Select the desired add-on tools that you want the new group employees to have access to.
- Click Apply Filter.
- Click the Employees tab.
- For each employee to be given access privileges:
- Select the employee's name in the top list.
- In the Permissions tab below the list, select the check box for the newly-created group (in our example, "Generic Add-On User").
- Click Update.
- Repeat for each employee to be added to the new group.
The third-party solution provider is best equipped to answer technical questions and respond to customer requests. Therefore, all third party add-on tools are supported by the provider. This includes support contact, setup, and help content. Support and contact information will be provided on the third-party solution interface.
Mitchell will support all integration licensing and add-on tool access permissions.