Payroll - Flat Rate and Commission
Use the payroll process in RepairCenter to facilitate labor hours and payment to technicians.
Note: For Dealer Management System (DMS) customers using the labor tab daily to post labor to ADP or Reynolds & Reynolds, see the accounting interface documents for instructions.
Caution: It is imperative that all of the dates regarding hours and payroll are correct. Every report in RepairCenter is dependent on date information; therefore, dates must be accurate.
- On the last day of the payroll period, confirm that all repair orders are assigned.
- Filter the Whiteboard by Due In date using the following filters. Ensure that the list on the top left of the tab is set to Due In.
- In the date fields to the right of between, enter the date range between the date of the oldest open repair order in your shop and the current payroll period ending date.
- Click the Apply button on the right.
- Review the resulting list and confirm that no repair order on the list still needs to be assigned.

- Do one or both of the following.
- If you are auto-flagging flat rate and commissions when entering a date, confirm that all dates (Completed, Delivered, or Closed) are entered. See “Automatically flag Flat Rate and Commission technicians when the following date is entered” on the More > Configuration > Production > General tab.)
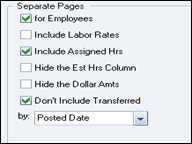
- Print theTechnician Payroll Report #49 (from the Reports menu and the Accounting tab). Have the technicians review the report for accuracy. When printing this report, ensure that the date range selected for Start Date and End Date in the lists at the top are the dates of your current payroll period.
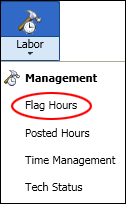
- If you need to flag any additional time to the technician, open the Labor menu and select the Flag Hours tab under Management. The repair order must be assigned to appear in the tab.
- Select the Enter flag hours to be posted on date.
Note: This date must fall within your current payroll period. - Select the Out Date between date ranges from the calendars. (The system default range is the next day to 60 days in the future.) You can go backward or forward as needed.
Recommendation: Go back 30 days instead of keeping the default as the next day. - Click the Apply Filter button.
- Select a technician by clicking on their name in the list above.
- The bottom section of the tab will show all repair orders assigned to the technician that fall within the date range specified above. The far right column, Hrs. Left, will indicate any repair order with remaining hours available for flagging for the current period. To flag the hours, double-click the repair order line in the Hrs Work field. Enter the number of hours to flag for the repair order. (Review the Hrs Left to confirm that the hours were flagged correctly.) The information on the tab can be printed for the technician as needed.

- Repeat steps 9-10 for each technician. The only difference you will see for flat rate, commissioned, or hourly technicians is the pay type displayed.

- Repeat step 5 above and review the Technician Payroll Report #49.
- Once the report is balanced to the amount you will be paying each technician for the pay period, you are ready to complete payroll.
- Print two copies of Report #49, one for processing payroll and one for the technician.
- Follow the Payroll Lock process as described below to finalize payroll.
- On the Accounting menu, click the down arrow and select Labor; the Labor tab opens.
- In the bottom section of the tab, enter the Start and End dates of your current payroll period in the Payroll Lock section.
- Click the Payroll Lock button.
- Confirm the date range in the Payroll Lock dialog box. If it is correct, click Yes. If not, click No and return to step 2 above to correct the date range.
If an error is made when using the Payroll Lock feature, notify your accounting department.