Customer Satisfaction (AutocheX Customer Experience Tools)
If you are licensed for Customer Experience Tools, you are provided with information on your customers' experiences with the insurance company and with your shop. Insurers and shops both use the Customer Experience Tools results to monitor and improve customer satisfaction, to retain and attract new customers, and to increase profitability. All of this information is provided through detailed and friendly customer surveys. AutocheX helps to ensure recent responses by sending a follow-up email if surveys aren't completed in five days.
When it comes to customer satisfaction, the bottom line is how quickly you can identify and resolve issues. Mitchell International does more than measure satisfaction; we help our clients convert their data into action. Our dynamic Web-based reports and Customer Alerts allow you to act quickly to solve problems, save customer relationships, and build loyalty.
In addition,
In this topic:
- Important Things to Know
- EMS Paths
- Setup: Sending Customer Information to Mitchell
- Alerts
- Customer Satisfaction Tab
- Reports
- Favorites/Subscriptions
- Tips
- Icons
- Troubleshooting
Important Things to Know
- RepairCenter must be restarted every day. If left running overnight, the Mitchell servers will terminate the connection at 10 pm PST and data will no longer be imported into RepairCenter. If the program is mistakenly left running overnight, close it and then restart it and log back in.
- It is not necessary that RepairCenter be running all day. As long as the program runs for at least 30 minutes a day, RepairCenter has time to read and upload EMS estimate data.
- Estimates do not need to be locked or committed before being uploaded into Customer Experience Tools AutocheX.
- There is a 19-day aging process. Because we receive estimate data directly from your shop, we wait a 19-day period before sending the data over to the Call Center for dialing.
- Uploaded estimate data is automatically filtered by Customer Experience Tools AutocheX. Once received, Customer Experience Tools AutocheX only surveys on behalf of the carrier and voluntary programs in which you are currently participating. Rejected data is not stored.
- RepairCenter does not need to be installed on all computers. RepairCenter needs to be configured to the shared network directory where all EMS estimate data is stored.
EMS Paths
Before RepairCenter can receive customer information from your estimating system, the EMS Paths must be set up. This is done in More > Configuration > Shop Setup > File Directories. See Estimating Interfaces for more detailed information.
Setup: Sending Customer Information to Mitchell
Before you can send customer information to Mitchell, you need to set up the file directories.
Customer information can be sent to Mitchell International automatically or manually, on a job-by-job basis. Learn about these options, including how to configure them, at AutocheX Customer Experience Tools.
Alerts
Survey Alerts
Interviews are normally conducted in the evening. Alerts are sent to you the next morning. The survey data is loaded into RepairCenter that evening and is available to you the next day. For example: if an interview is completed on Monday night, you will receive an alert on Tuesday morning. The database is updated Tuesday evening, and the survey is available to you Wednesday morning.
Sample Status Alerts
Each week, on Sunday evening, you will receive a sample status alert e-mail from acxcustsvc@mitchell.com. The e-mail will list for you all samples received by Customer Experience Tools AutocheX during the previous week.
If no sample was uploaded, you will also receive an alert message notifying you that we have not received any sample to dial on for that past week. The message alert line will read: "IMMEDIATE ATTENTION - NO SAMPLE - ACTION REQUIRED". The e-mail text provides a call to action and the direct phone number of our customer service group who can help in the troubleshooting process.
Note: Should you need to change the e-mail address that receives the alerts, please provide your shop name, Mitchell account number, and updated e-mail address to: acxcustsvc@mitchell.com.
Customer Satisfaction Tab
Access to the Customer Experience Tools reports is from the Surveys icon .
Two sub tabs are on the top half of the Customer Satisfaction tab:
- Favorites - you can save frequently used reports.
- Reports - new reports are created.
The Favorites and Reports tabs are divided into several areas:
- On the Reports tab, under Shops, single shops see only their shop name. Multi-shops see their shop hierarchy.
- In both tabs, reports are listed in the top half of the window, and to the right of the shop name list in Reports.
- The selected report displays in the lower half of the window.
- You can use the arrows between areas of the window to open or close each section:
Reports
Once you have generated a report, you have several options:
- Change the parameters for a different report and click View Report.
- Print or export (save) a created report using the icons in the tool bar (see below).
- Click Save as New Favorite to save it to the Favorites tab, to be re-run at any time. (See below.)
Favorites
When you save a report as a Favorite, it creates an easy way to re-run the report without having to re-create it first. Once a favorite report has been saved, you can also schedule it for automatic delivery.
Favorite reports can be modified or deleted at any time.
![]() To generate and run a favorite report
To generate and run a favorite report
- Favorite reports that are set for automatic delivery have a small calendar icon before the report name. You can add or remove the automatic delivery for any favorite report by selecting the report, configuring it, and then selecting or clearing the automatic delivery option.
- The tab is divided
into sections by bars. These bars contain a section with an arrow. Selecting
that arrow will expand or collapse that section.
 (see image)
Icons
The toolbar contains icons that assist you in viewing a multi-page report, printing, and saving.
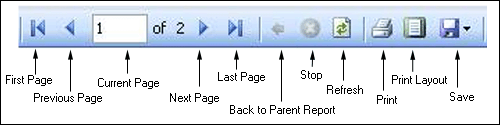
- Use the left and right arrows to move through the pages of a multi-page report.
- Click the Back arrow to return to the Parent Report.
- Click Stop to stop the report from completing.
- Click Print to open the print dialog box. Select the appropriate print options, then click Print.
- Click Print Layout to define what you want the printed report to look like.
- Click Save to open a save dialog box. Select the file location, and enter the name of the report being saved. Then click OK.
- Why doesn't my report have data? The parameters are set to default to the current month. If you do not have surveys completed in the current month, no data may appear (depending on the report). Select a prior month or YTD.
- How do I get back to
my list of Favorite reports after I run a favorite report? When you run
a favorite, the report section automatically expands to maximize report
viewing area. Select the arrow bar near top to re-open the favorite report
list.
See Also
Customer Experience Tools FAQs
AutocheX Customer Experience Tools Setup
Survey Sentiment Dashboard
Reputation Manager